You know how to use the Camera app on your iPhone or iPad to take a video, but did you know that you can also record a video of what happens on the screen of your device? That’s useful if you’re trying to explain the steps of some technical process to a friend or show a tech support rep what’s going wrong in an app or Web site. You could also use a screen recording to copy a video from Facebook, for instance, that you want to send to a social media–averse friend.
First, to get set up, go to Settings > Control Center > Customize Controls and tap the green + button next to Screen Recording to add it to the list of controls that appear in Control Center. Drag it in the list to rearrange where its round Record button will show up in Control Center. Here’s a screen recording showing those steps:
Making your first screen recording is simple. Follow these steps:
Open Control Center. (Swipe up from the bottom edge of the screen, or, if you’re using an iPhone X or later, or an iPad running iOS 12, swipe down from the top-right corner of the screen.)
Press deeply on the Screen Recording button to open a menu. If you want to record your voice via the microphone as well, tap the Microphone button to turn it on.
Tap Start Recording, and then wait for the 3-second countdown.
Perform the actions that you want to be recorded.
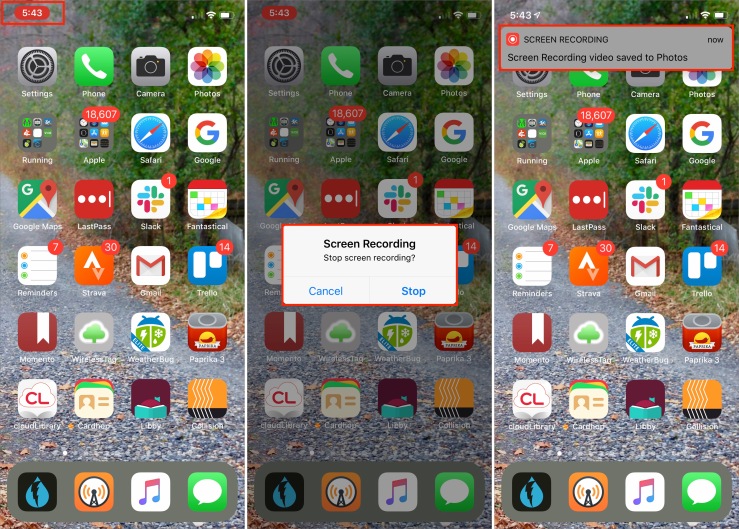
To stop the recording, either enter Control Center again and tap the red Record button or tap the red status icon at the upper left of the screen and tap Stop. A notification appears, telling you that your screen recording
In fact, if you want to keep your options for the destination app and microphone at their current settings, making a screen recording is even easier:
Open Control Center.
Tap the Record button instead of pressing deeply.
Perform your actions.
Stop the recording via Control Center or the red status bar.
Told you it was simple. But we bet you have questions, so let’s provide some answers.
Where did my screen recording go?
As the notification informs you, screen recordings end up in the Photos app, just like any other photo or video. You’ll see them both in the Photos view and in Albums > Media Types > Videos.
What are Messenger and Skype doing in the screenshot earlier?
Instead of recording your screen to a video file, you can instead broadcast it to a Facebook Messenger or Skype chat. That might be useful for a quick show-and-tell while having a conversation.
Can I edit the screen recording?
Yes, although the Photos app limits you to trimming frames from the start and end of the video (which actually creates a new video with your selection rather than editing the original). For more significant editing, tap the ••• button in the Photos edit interface and send the video to iMovie.
Is there any way to show my taps and drags in the screen recording?
Yes, but it’s not easy. There’s a trick that relies on iOS’s Accessibility features, but it’s way too clumsy and leaves the Assistive Touch button on the screen the entire time. A better approach would be to use a dedicated app like ScreenFlow(which is what we used above) to insert circles where your fingers touch down, but that’s worthwhile only for videos where you need higher production values.
For the most part, though, the point of screen recordings is not to make the perfect movie—it’s to create and share a video of something that would otherwise be difficult or impossible to convey.
Apple’s prices for Lightning, USB-C, and Thunderbolt 3 cables often seem high—$19 for a USB-C to Lightning cableor $29 if you want a 2-meter version? Unfortunately, when it comes to cables, you often get what you pay for. Happily, other reputable hardware manufacturers like Ankerand Belkinmake quality cables and often charge less than Apple.
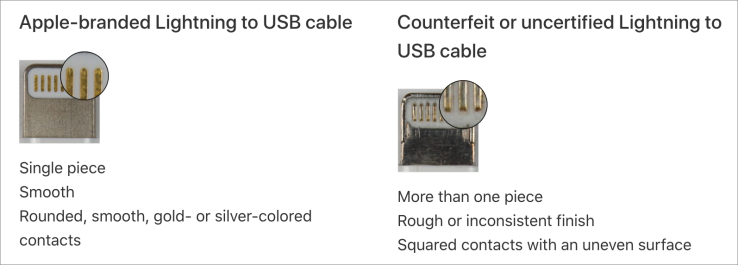
Stay away from the bargain basement prices from no-name Chinese manufacturers, and if you see a supposedly genuine Apple cable selling for a too-good-to-be-true price, consider the possibility that it’s counterfeit. Apple has even created a detailed page that explains how to identify counterfeit or uncertified Lightning accessories.
The problem with cheap cables is not just that they might break or wear out sooner, but that many modern cables carry power as well as data. When there’s sufficient juice flowing down those tiny wires, a short-circuit can fry hardware or in the worst cases, generate sparks, smoke, or even fire. Don’t misunderstand—fires aren’t likely, but over the years, there have been numerous headlines about fires caused by charging iPhonesand Android smartphones. In fact, Target just recalled 90,000 Lightning to USB cablesafter 14 reports of the cables smoking, sparking, and igniting.
When it comes to damaging hardware, USB-C was a problem early on but is less so now, thanks to the efforts of Google engineer Benson Leung in 2015 and 2016. After a bad USB-C cable fried his Chromebook, he embarked on a one-man crusade to identify which USB-C cables were good and which were bad. He has moved on from that now, but in part due to his efforts, Amazon started prohibiting listings of USB-C cables and adapters that weren’t compliant with the USB-C specs. You might still run across bad cables that Amazon hasn’t yet identified, or dodgy cables sold through other retailers, but the danger is lower than it used to be, particularly with cables from name brands.
Lightning cables are incredibly common these days—you can buy them in gas stations and drugstores—and as with USB-C cables, you’ll do best if you stick with cables from brand name companies. You’ll pay more, but do you really trust electronics sold next to Twinkies and Slim Jims? It might be worth buying one in a pinch, but don’t rely on it.
Of course, even the best cables will fray and fail if you mistreat them. Follow this advice to ensure a long life for even heavily used cables:
Don’t create sharp bends in the cable, especially near the connector. Sharp bends can eventually break the insulation and reveal the wires inside.
When unplugging your device, pull from the plug instead of further down on the cord. That avoids stress near the connector.
When coiling your cables, avoid wrapping them tightly around something that’s not round. A tight wrap can cause kinks that will degrade the wires inside.
Don’t put heavy objects on cables, or sandwich them between a desk and the wall. Anything that compresses the cable can cause damage.
iPhones may be fairly water resistant these days, but try to keep both the Lighting port and the cable’s pins clean and away from liquids because crud or a droplet could cause a short circuit. USB-C cables are less susceptible to such problems because of their metal jackets, but it’s still worth being careful.
If a cable’s insulation ever breaks so you can see the wires inside, wrap it with electrical tape right away, and replace it as soon as you can.
In the end, the advice is pretty simple. Spend a little more on quality products from reputable manufacturers so you don’t have to worry about your $1000 iPhone XS being damaged by a $3 counterfeit Lightning cable.
At Apple’s Worldwide Developer Conference on June 3rd, the company unveiled the next versions of all its operating systems—macOS 10.15 Catalina, iOS 13 (and a new iPadOS), watchOS 6, and tvOS 13–along with the much-anticipated new Mac Pro and Pro Display XDR.
Nothing that was announced will ship until later this year—probably September—but we wanted to give you a quick overview of what’s coming down the pike.
macOS 10.15 Catalina
With macOS 10.15, which Apple is calling “Catalina,” the company is working to bring macOS and iOS ever closer while preserving what makes the Mac special.
For instance, Catalina replaces the increasingly overloaded iTunes with three new apps that mimic those in iOS: Music, Apple Podcasts, and Apple TV. Reminders, Notes, and Photos also see significant enhancements that are mirrored on the iOS side, and a new Find My app on both platforms combines the capabilities of Find My iPhone and Find My Friends. Apple is even bringing Screen Time from iOS to the Mac to help you track and control your usage—and that of your kids—across all your Apple devices.
Some of these apps exist on the Mac thanks to Project Catalyst, an Apple technology that makes it easy for developers to convert iOS apps to the Mac. Apple used Catalyst internally last year to bring Home, News, Stocks, and Voice Memos to macOS 10.14 Mojave. This year, Apple is letting third-party developers use Catalyst, so once Catalina ships, we’ll see a flowering of new Mac apps coming over from iOS.
Another new technology, Sidecar, lets you use an iPad as a second screen for a Mac, either wired or wirelessly. Sidecar even enables you to use the iPad and Apple Pencil as a graphics tablet with apps that support such an input method. Two other new features will let you use a Sidecar-connected iPad to mark up any PDF or insert a sketch into a Mac document.
Catalina promises many more features, including some that will increase macOS security and others that will make the Mac much easier to use for people with disabilities. For instance, the new Voice Control capability lets you run a Mac (or an iOS device) entirely with your voice—it’s amazing.
If you’re running Mojave now, you’ll be able to run Catalina too since the system requirements remain the same.
iOS 13
With iOS 13, Apple appears to be focusing once again on performance and refinements. The company claimed we’ll see faster Face ID recognition, smaller app downloads and updates, and quicker app launches.
The most apparent new feature will be Dark Mode, which Apple is bringing over from Mojave. It displays light text on a dark background, which can be welcome when using an iOS device in a dark room without bothering others. It also may increase battery life on OLED-based iPhones like the iPhone X, XS, and XS Max. But keep in mind that research shows the human eye and brain prefer dark text on light backgrounds, so you may read more slowly and with less recall in Dark Mode.
Along with the apps mentioned previously that also improve in iOS, Apple said it has rebuilt Maps and its underlying database from the ground up, so you’ll see far more detailed maps, and you can zoom in for a street-level photographic view called Look Around.
Camera and Photos received attention as well, giving you faster access to effects and letting you apply effects to videos as well. You can even crop and rotate videos taken in the wrong orientation—finally!
Other improvements include a new Sign In with Apple option for signing in to apps using your Apple ID, full text formatting in Mail, shared folders in Notes, SMB sharing in Files, iCloud Drive folder sharing, and support for USB thumb drives.
In terms of system requirements, iOS 13 drops support for some older devices, leaving the iPhone 6s, 6s Plus, and SE as the oldest iPhones supported, along with just the newest iPod touch.
iPadOS
Joining Apple’s other operating systems this year is iPadOS, a superset of iOS 13 that provides additional iPad-only features. In some ways, it’s nothing new, since the iPad has always had unique features, but it shows how Apple wants to differentiate the iPad from the iPhone.
In iPadOS, the Home screen holds more icons in a tighter grid, and you can pin the Today View widgets on the side of the screen. Safari will be able to support complex Web apps like Google Docs, Squarespace, and WordPress, and it gains a download manager that lets you download files into the Files app.
Apple enhanced iPad multitasking so you can switch between apps in a Slide Over view, open multiple windows from the same app in Split View, and use App Exposé to navigate among your app combinations. Plus, text editing improves significantly, with direct access to the cursor and easier text selection, as well as new three-finger gestures for cut, copy, paste, and undo. The iPad even gets full-featured font management, and you’ll be able to buy fonts from the App Store.
iPadOS won’t work on many older iPad models, though it is compatible with all iPad Pro models, the fifth- and sixth-generation iPad, the iPad mini 4 and fifth-generation iPad mini, and the iPad Air 2 and third-generation iPad Air.
watchOS 6
With watchOS 6, Apple is working hard on health and fitness capabilities for the Apple Watch. The company has added a Noise app that can warn you when sounds approach dangerous levels and a Cycle Tracking app that helps women monitor their periods and predict windows of optimal fertility. And, the Activity app has picked up trending features so you can see how you’re doing across time in a number of health metrics.
Apple has also untethered the Apple Watch from the iPhone to an extent, allowing developers to create standalone watch apps that don’t require a companion iPhone app and opening an App Store for such apps that you can browse and search from your wrist.
Other new watchOS 6 apps include Audiobooks, Calculator, and Voice Memos. Plus, once you upgrade to watchOS 6, you’ll be able to choose from more faces and additional complications.
As with watchOS 5, watchOS 6 will work on all Apple Watch models other than the original unit, but not all features are available on all models.
tvOS 13
The big news for tvOS 13 is that it finally gets multi-user support, so everyone in a household will be able to have their own personalized experience. (Speaking of which, the HomePod will also support multiple users with iOS 13.)
Apple has redesigned the tvOS Home screen to show previews, added a slide-in Control Center like in iOS and watchOS, and updated the Music app to show lyrics in sync with the currently playing song. The screensaver also goes under the ocean so your cat can be entertained by all the fish.
Finally, in a move that will significantly enhance the forthcoming Apple Arcade game subscription service, both tvOS and iOS will support the Xbox One S and PlayStation DualShock 4 game controllers.
Mac Pro and Pro Display XDR
Although the Worldwide Developer Conference is mostly about Apple’s operating systems, the company took advantage of the keynote to show off the completely redesigned Mac Proand its companion screen, the Pro Display XDR. The technical specs of both are astonishing—Apple has done what looks like a fabulous job of designing the most modular, flexible, and powerful Mac ever, combined with a display that competes against reference monitors costing tens of thousands of dollars.
The Mac Pro will rely on Intel Xeon W processors with 8 to 28 cores, and you’ll be able to configure it with up to 1.5 TB (that’s terabytes!) of RAM. It has eight PCI Express expansion slots, into which you can install MPX modules that contain up to four AMD Radeon Pro graphics cards for massive number crunching performance. Another slot can hold Apple’s new Afterburner accelerator card for ProRes and ProRes RAW video acceleration, and a half-length slot contains Apple’s I/O card with two USB-3 ports, two Thunderbolt 3 ports, and to 10 Gb Ethernet ports; there are two more Thunderbolt 3 ports on the top of the case. Storage starts at 256 GB of SSD and goes up to 4 TB.
All this fits into a stainless steel frame with an aluminum case that lifts off to provide access to all sides of the Mac Pro. It has a massive 1.4-kilowatt power supply and relies on three fans and a blower to keep the unit cool. It even has handles on the top and optional wheels in case you need to move it around regularly.
Accompanying the Mac Pro will be Apple’s first monitor in years, the Pro Display XDR. It’s a 32-inch 6K screen that supports P3 wide and 10-bit colorthat can display more than 1 billion colors accurately. It’s also incredibly bright and can sustain 1000 nits of full-screen brightness or peak at up to 1600 nits.
If your eyes glazed over reading those specs, this new hardware isn’t for you. Apple is aiming it at high-end professionals, the sort of people who happily spend many thousands of dollars on new hardware to enable faster video editing, data processing, or other performance-intensive tasks. The base-level Mac Pro will start at $6000, and the Pro Display adds another $5000. Even the Pro Stand (which provides tilt and height adjustment, plus rotates to portrait orientation) for the Pro Display costs $1000, so a tricked-out Mac Pro setup could easily exceed $20,000. So no, this is not a Mac for “the rest of us,” but it’s great to see Apple ensuring that the most demanding Mac users can stay on the platform.
Have you ever gotten an emergency alert on your iPhone, telling you about an abducted child or public safety emergency? That’s the Wireless Emergency Alerts(WEA) system, at least in the United States, although some other countries have similar systems.
The WEA system enables authorized national, state, and local government authorities to send alerts about public safety emergencies to mobile devices in the affected area. Also included in the WEA system are AMBER Alerts designed to solicit public information when law enforcement is searching for a missing child. Some US states also broadcast Silver Alerts about missing adults, particularly senior citizens with Alzheimer’s, dementia, or other mental disabilities. The alerts are always meant to be useful, either to you or to law enforcement working on a case.
Unfortunately, the alerts aren’t always helpful or well targeted. Worse, they break through the Do Not Disturb cone of silence, and there’s no way to change their tones. You might not appreciate being woken up at 2 AM to be told to look for a white Ford that’s potentially associated with a missing child. Plus, although the AMBER Alerts are generally popular with the public, research suggests that they’re largely ineffective.
More concerningly, the loud noise that accompanies the alerts can be dangerous, either to your hearing if you’re wearing earbuds when the alert comes through, or to your life if you overreact while driving.
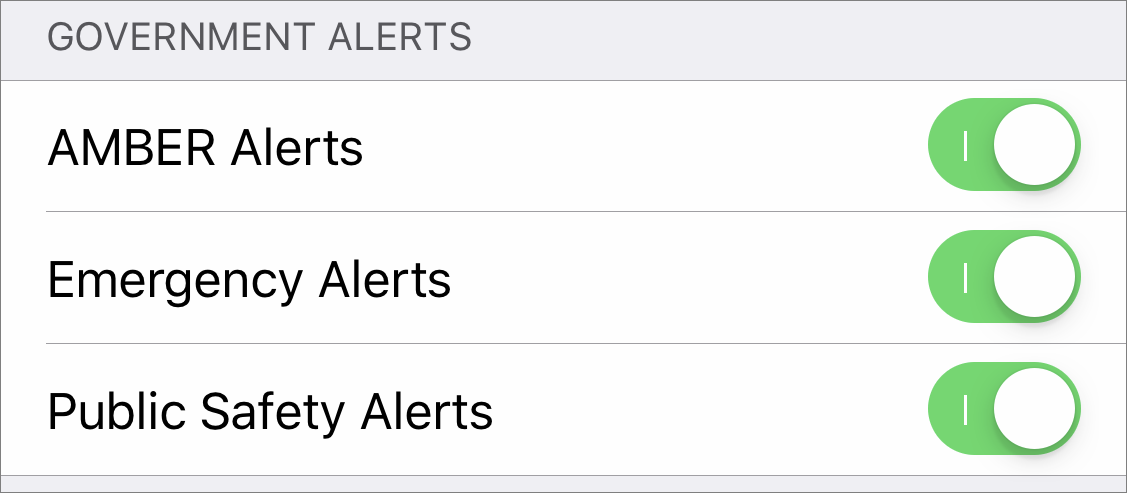
In iOS 12 in the US, you’ll see three categories of government alerts at the bottom of Settings > Notifications: AMBER Alerts, Emergency Alerts, and Public Safety Alerts.
In most countries, Apple lets you turn off all three categories, but you could still receive so-called “Presidential Alerts,” which are meant to reach everyone in the country during a national emergency. The Federal Emergency Management Agency, which manages the WEA system, tested the Presidential Alert system for the first time in October 2018.
What should you do? It’s entirely up to you, of course, but in most situations, it’s probably best to leave all three alert types enabled. If you find yourself being annoyed by repeated AMBER Alerts or Silver Alerts, particularly if you’re unlikely to be in a location where you could be helpful, you might want to toggle the AMBER Alerts switch off. But the Emergency and Public Safety alerts could be essential, especially if you’re in an area prone to hurricanes or tornadoes.
If you’ve already disabled the alerts because of poor targeting—being notified of something of concern only to people hundreds of miles away is just an interruption—you might consider turning them back on later this year, since the FCC requires carriers to improve the geo-targeting starting November 30th, 2019.
Can’t Remember When Your Warranty Expires? iOS 12.2 Lays It Out
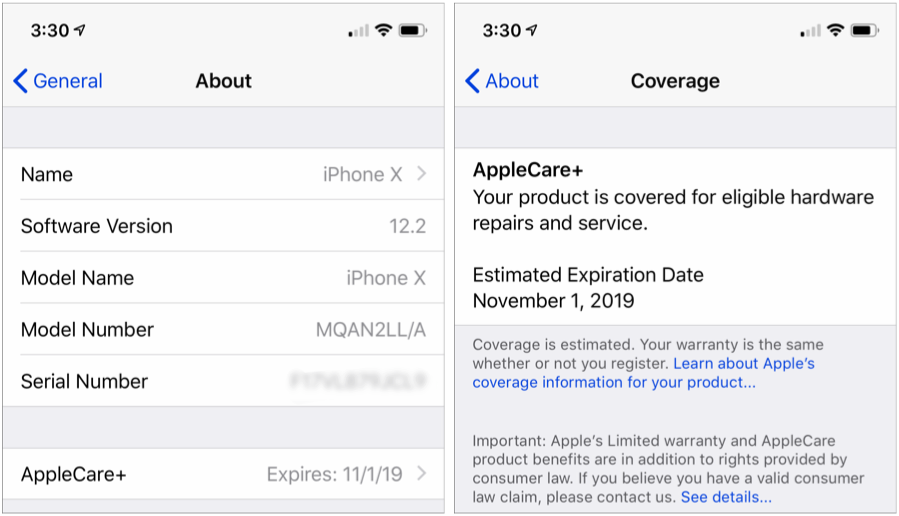
With luck, you should never need to check your iPhone’s or iPad’s warranty status. But bad things do happen to good devices. In iOS 12.2, Apple has just made it easier to figure out if your device is still under warranty or covered by AppleCare+. Go to Settings > General > About, where you’ll find a new entry that’s either called Limited Warranty (the basic Apple warranty) or AppleCare+ (the extended warranty you can buy). The entry shows the expiration date, and tapping it provides more details on the Coverage screen. If your iPhone or iPad doesn’t have AppleCare+ but is eligible for it, you can even buy it from this screen. You won’t see anything if your device is out of warranty and no longer eligible for AppleCare+.
Macs haven’t had removable storage for years, so when you want to move files between computers, you can use USB flash drives, email, Messages, AirDrop, or local file sharing. Those techniques are fine, but for a more efficient, effective, and elegant solution, try a cloud-based file sharing service.
These services use special software to integrate into the Mac’s Finder, designating a particular folder to hold shared files. Whenever you add a file to that folder—or any subfolder inside it—the software automatically uploads it to the cloud and downloads it to linked devices. File changes and deletions sync quickly, so the shared folder remains in sync everywhere at all times. iOS’s Files app also provides a single interface to the main services on your iPhone or iPad.
File sharing services provide two key capabilities:
They allow you to share files between your own devices, including Macs, iPhones, iPads, and Windows-based PCs. This makes it easy to access your data wherever you are and on whatever device you’re using.
They let you share files or folders with others, sometimes with permissions- or date-based restrictions. Such capabilities are incredibly effective for workgroup collaboration.
Numerous cloud-based file sharing services exist, but the most popular are Box, Dropbox, Google Drive, iCloud Drive, and Microsoft’s OneDrive, all of which offer free plans with limited amounts of storage.
Box
Boxis aimed primarily at large enterprises, with plans priced at $5, $15, or $25 per user per month. The main differences between those plans revolve around things like the number of users, administrative controls and security reporting, and custom branding. Box integrates with hundreds of apps and offers a platform on which companies can build their own collaboration and workflow solutions.
Box also offers a free Individual plan with 10 GB of storage. A Personal Pro plan costs $10 per month, but that provides only 100 GB of storage, much less than the competition.
Dropbox
The 800-pound gorilla of the file sharing space is Dropbox, which popularized the concept starting in 2007. A free Basic account offers 2 GB of storage space, but for $9.99 per month, the Plus plan gives you 1 TB and the $19.99 Professional plan doubles that to 2 TB and provides additional controls. If you
need to share a folder with someone, Dropbox is generally the best option because so many people already have accounts.
For teams, Dropbox Business provides Standard ($12.50 per user per month) and Advanced ($20 per user per month) plans that increase the space even further and add administrative controls, increased security options, and more.
Google Drive
Conceptually, Google Driveis where Google Docs, Google Sheets, and Google Slides store their files. However, it also lets you store any type of file, and Google provides 15 GB of free storage with every Google account. For those who need more storage, Google offers a variety of storage tiers, including 100 GB ($1.99 per month), 200 GB ($2.99), and 2 TB ($9.99).
Google Drive Enterprise extends the service for teams with additional collaboration, workflow, and security tools. It’s priced at $8 per active user per month plus $0.04 per gigabyte of data stored. If you want the full G Suite, which includes Gmail, Google Docs, video conferencing, team messaging, and shared calendars, $6 per user per month buys 30 GB of storage and $12 per user per month buys unlimited storage.
Google generally assumes you’ll do everything in a Web browser or a smartphone app, but with the company’s Backup and Syncsoftware for the Mac, it provides the same level of Finder integration as other services.
iCloud Drive
Although Apple’s iCloud Driveis deeply integrated into macOS and iOS and numerous apps, it’s the weakest of the file sharing services. That’s because Apple focuses on individuals, not groups or teams. iCloud Drive works fine for sharing files among your own devices, and it allows you to share individual files (but not folders) with anyone who has an Apple ID.
Apple gives all Mac and iOS users 5 GB of free space in iCloud Drive, although things like iCloud backups of your iOS devices can use that up quickly. For $0.99 per month, you can get 50 GB, $2.99 per month gets you 200 GB, and 2 TB costs $9.99 per month. There are no business plans, but you can share the purchased space with other members of a Family Sharing group.
OneDrive
Most of Microsoft’s Office 365 subscriptions include OneDrivestorage—a $99.99 per year Office 365 Home plan provides 1 TB for each of up to six users, whereas a $69.99 Office 365 Personal subscription is for just one user. On the business side, you can pay $5, $8.25, or $12.50 per user per month for different Office 365 plans. The low-end plan doesn’t include the desktop versions of the Office apps, and the high-end plan provides Exchange, SharePoint, and Teams in addition to all the Office apps and 1 TB of OneDrive storage for each user.
How to Choose a Service
Which of these services is best for your needs? That’s a potentially complicated question, and we’re happy to talk with you directly to make a recommendation. That said, here are the basics.
If you mostly need to share files among your own devices and want to share the occasional file with another Apple user, iCloud Drive may be sufficient, especially if you are already paying for more storage for iCloud Photos. Those who are heavily invested in Google’s G Suite or Microsoft Office 365 should focus on Google Drive or OneDrive. If you aren’t already in bed with Google or Microsoft, Dropbox is the best bet for most individuals and groups, although larger organizations should also evaluate Box.
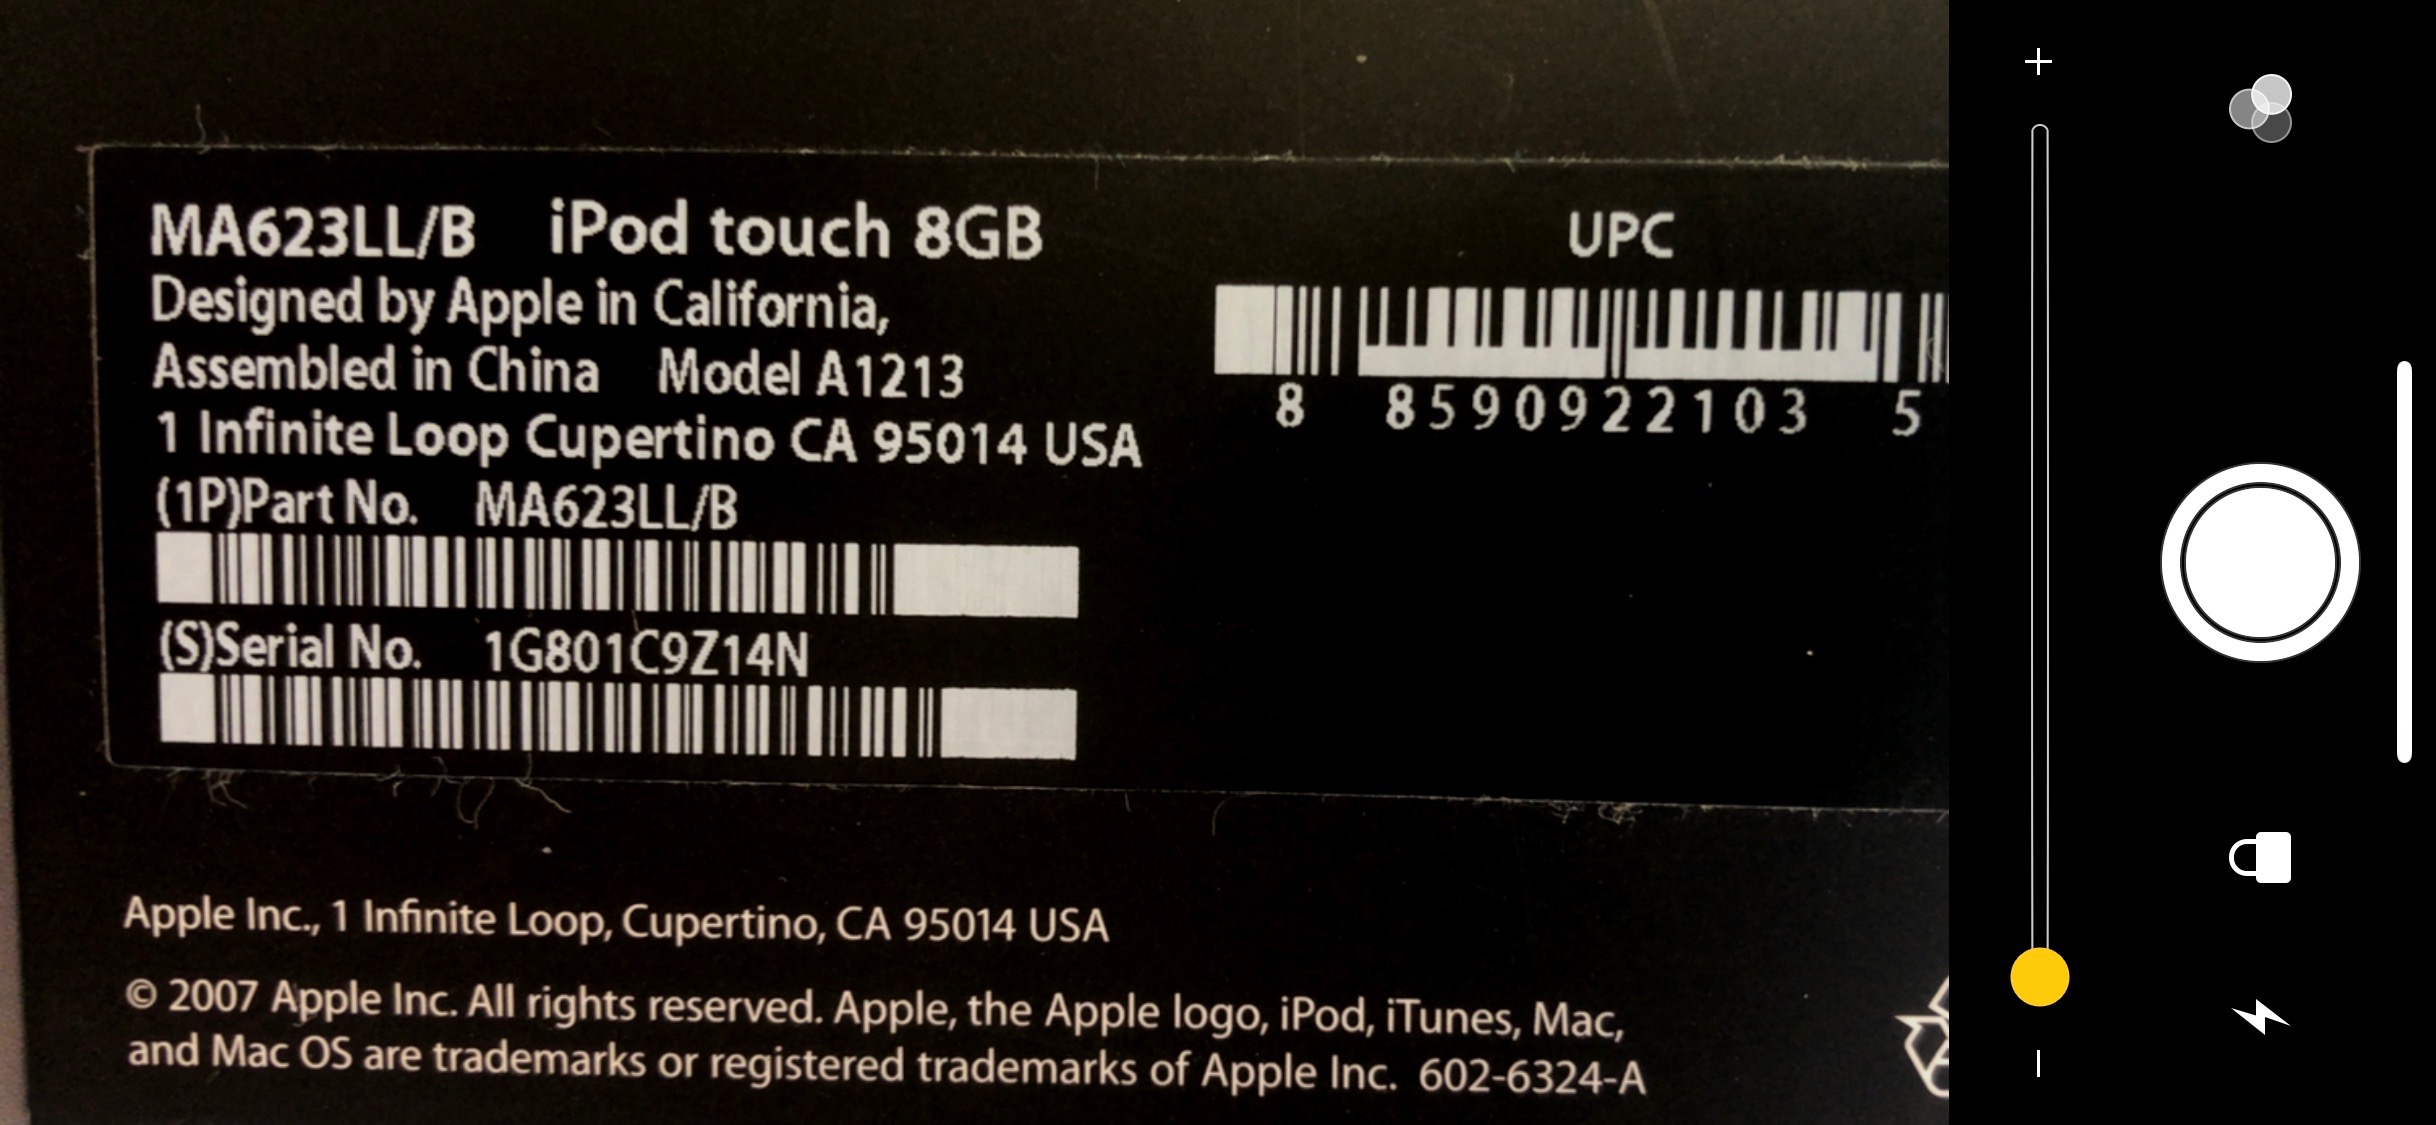
A Quick Trick to Turn Your iPhone into a Magnifying Glass
It’s maddening to want to read a serial number or other bit of fine print that you can barely see. But fret no longer—your iPhone or iPad makes a fabulous magnifying glass! Assuming Magnifier is enabled in Settings > General > Accessibility > Magnifier, you can bring it up by pressing the Home button (for Touch ID devices) or side button (for Face ID devices) three times quickly. If that’s too hard to remember, you can also add a Magnifier button to Control Center in Settings > Control Center > Customize Controls. The special camera viewfinder is zoomed automatically, but you can change the zoom level with the slider, tap the flash icon to turn on the LED light (if available on your device), enable a filter to change the color or contrast, or lock the focus by tapping the lock icon. You can also freeze the image by tapping the white shutter button, which is great for grabbing a picture of a tiny serial number on the back of some device (tap that button again to resume using Magnifier). To leave Magnifier, press the Home button or swipe up from the bottom of the screen.
Collaboration is what all the cool kids—well, all the competitive businesses—are doing these days because it’s efficient and effective. See “Stop Mailing Files Around and Use Collaborative Apps” and for users of Apple’s iWork, “Collaborate with Colleagues in Pages, Numbers, and Keynote.” Today we’re going to look at collaborating using Google’s Web-based productivity suite, Google Docs, which businesses can use for free or as part of a G Suitesubscription.
The Google Docs suite competes with Apple’s iWork and Microsoft’s Office 365, providing Google Docsfor word processing, Google Sheetsfor spreadsheet work, and Google Slidesfor presentations. You can manage all your files in Google Drive. Although all are Web-based and work best on a Mac or other desktop computer, Google also makes iOS apps that let you work—a bit less flexibly—on an iPad or iPhone.
You’ll need a free Google account to create new documents, and for full-fledged collaboration, your colleagues will need Google accounts too. You can share documents with people who lack Google accounts or don’t want to sign in, but their comments and changes will be anonymous.
Invite Collaborators
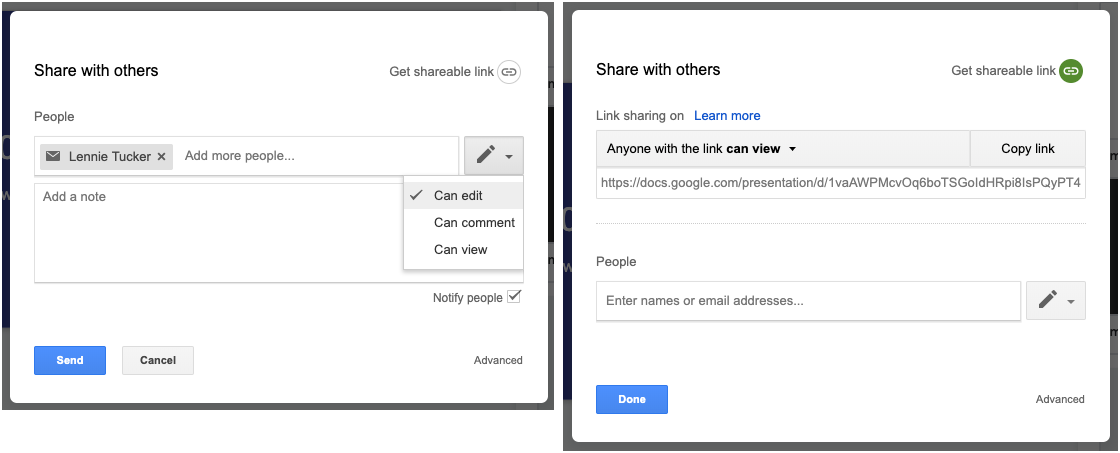
Once your document is ready to share, you can invite collaborators by clicking the large Share button in the upper-right corner of the window.
Flexible permissions let you share with specific people, and for each person, set whether they can edit, comment on, or just view the document (below left). You can also add a note that will be sent with the invitation.
If that’s too specific—you’re sharing with a large group, for instance—click Get Shareable Link to turn on link sharing (above right). Then you can set the permissions for the link by clicking the down-pointing arrow next to “Anyone with the link can…” This works well for things like self-service signup spreadsheets. Copy the link and send it however you like, such as via Messages or to a mailing list.
If you add people over time, you can see who has access by clicking Advanced. That view also provides more owner controls, including the option to prevent commenters and viewers from downloading, printing, or copying.
When you’re done, click Send or Done.
Accept an Invitation
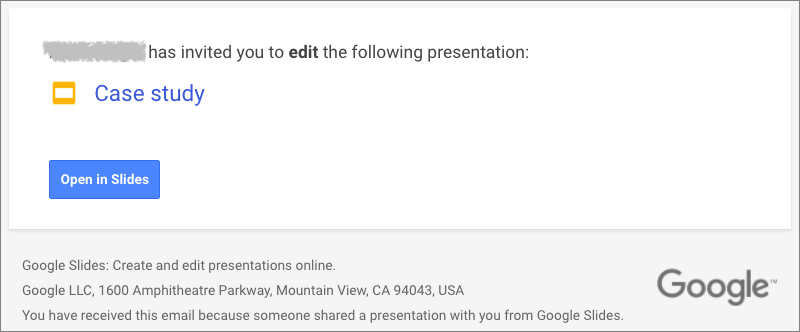
People you invite receive an email invitation and click the Open In button to start working on the document. With link sharing, all the recipient has to do is click the link.
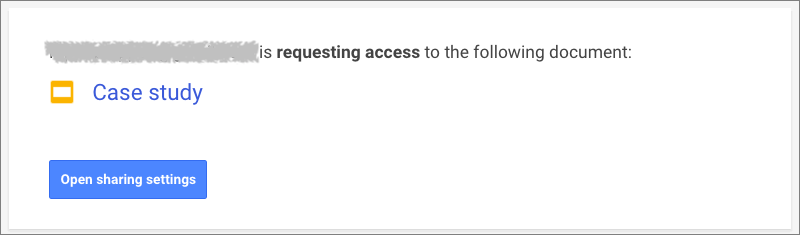
The main gotcha is that recipients must sign in to their Google accounts if sharing has been restricted to specific people. A less common problem can occur when you send an invitation to someone at an email address that doesn’t match their Google account, which prevents them from collaborating. They can then request that you share the document with their Google account; click the Open Sharing Settings button in the request email to grant access.
Add and Change Data
Apart from the permissions that restrict collaborators to commenting or viewing, there are no limitations on what people can do in a shared document—all editors are equal, and Google Docs works the same whether a document has one person using it or ten.
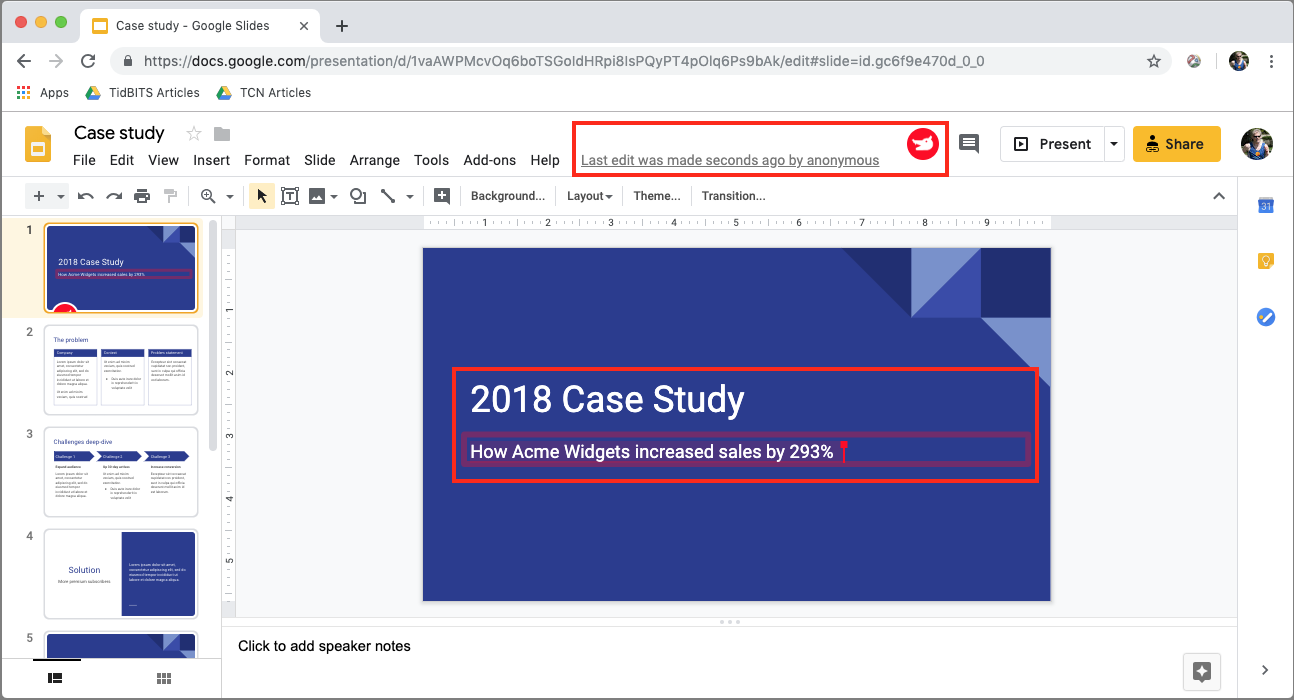
You can see who is in the document by the little avatar icons in the menu bar. It also tells you when the last edit was, and Google Docs always shows where other users are working with a color-coded cursor and marks when other users have selected content in the document with a colored highlight box.
Add Comments
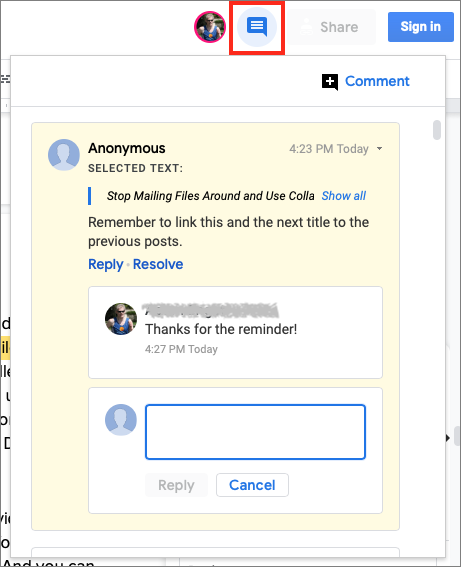
The beauty of comments in a collaborative scenario is that discussions can occur in context. To add a comment, select some text and choose Insert > Comment. Comments show up in the right-hand sidebar in Google Docs and Google Slides; in Google Sheets, the cell containing a comment gets a little yellow triangle in the corner, and the comment appears when you click the cell.
Google pioneered comment conversations, which allow collaborators to reply to each others’ comments and keep the discussion connected to the initial comment. You can edit or delete your own comments by clicking the stacked three-dot More menu. Do that for someone else’s comment and you can get a link to the comment—it’s useful if you need to point someone to the discussion.
To see all the comments in a stream, click the Comment History button in the menu bar, which looks like a speech balloon. It’s especially useful when reviewing comments in Sheets, where you would otherwise have to click all the little yellow triangles in cells.
View Versions and Suggested Changes
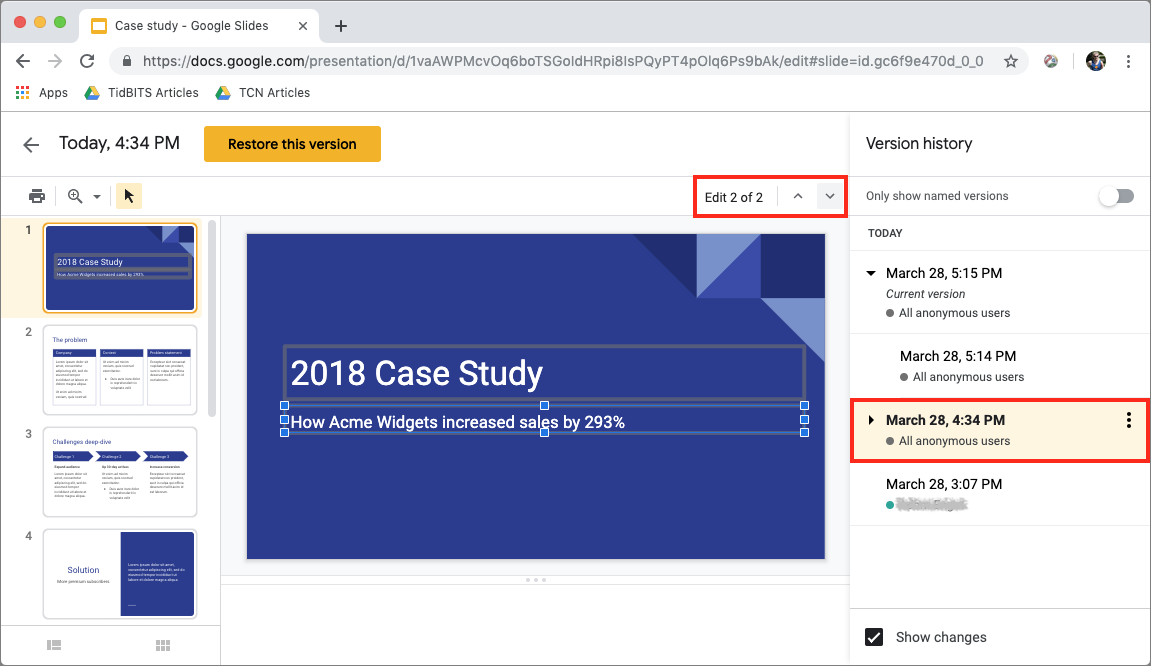
The main way to see who has done what in a document is by choosing File > Version History > See Version History. That displays a right-hand sidebar showing dates when the file was changed; click an entry to see the changes in the main pane. Arrows above the main pane let you highlight each change in turn. If you want to revert to the selected version (which will delete all subsequent changes!), click Restore This Version.
For Google Sheets and Google Slides, version history is all that’s available, which can be frustrating because when you’re reviewing edits in version history, you can’t make changes. As a workaround, open a second browser window so you can review changes in one window and make edits in another.
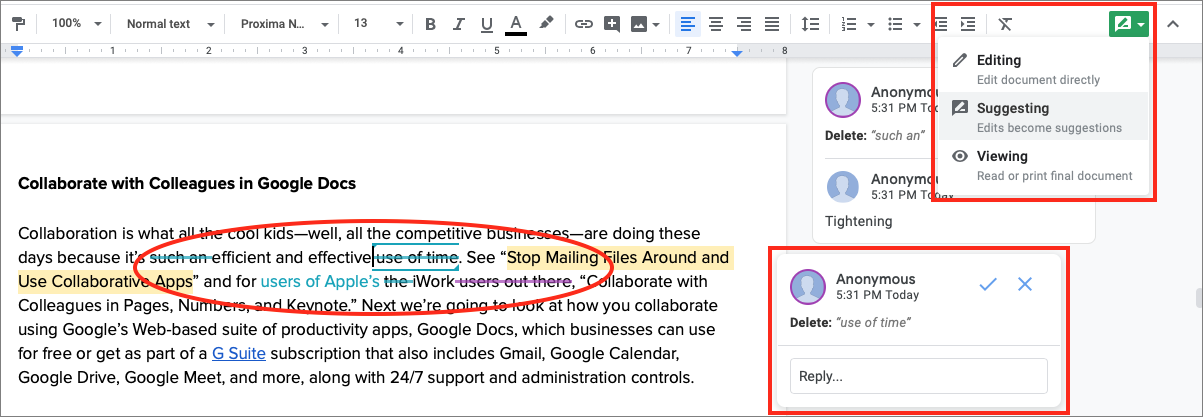
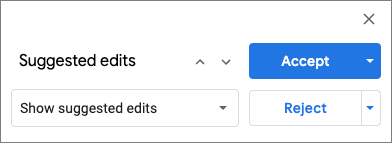
Google Docs (the word processor, in this case) offers another choice: Suggesting mode, which works more like Track Changes in Page or Word. Switch into it by clicking the pencil icon in the upper-right corner and choosing Suggesting. From then on, all edits are non-destructive and are color-coded by the person who makes them. They’re coupled with boxes in the right-hand sidebar that detail the change, provide ✔ and X icons for accepting or rejecting the change, and offer a Reply field that enables discussions of each change—a brilliant feature.
If you want to be guided through all the suggested edits, or accept or reject changes all at once, rather than handling them one at a time in the right-hand sidebar, choose Tools > Review Suggested Changes.
When you’re done collaborating on a document, you can click the Share button and remove people or turn off link sharing. That immediately prevents others from making more changes.
When choosing a collaboration platform, you’ll generally pick what your colleagues use, whether that’s Google Docs, iWork, or Office 365. However, if you’re sharing with people whose platform and app details you don’t know, Google Docs is the best choice—Google accounts are common and the Google Docs apps work equally well on all computers. Plus, since Google Docs was built from the ground up for collaboration, it’s a mature solution that’s quick, easy, and effective.
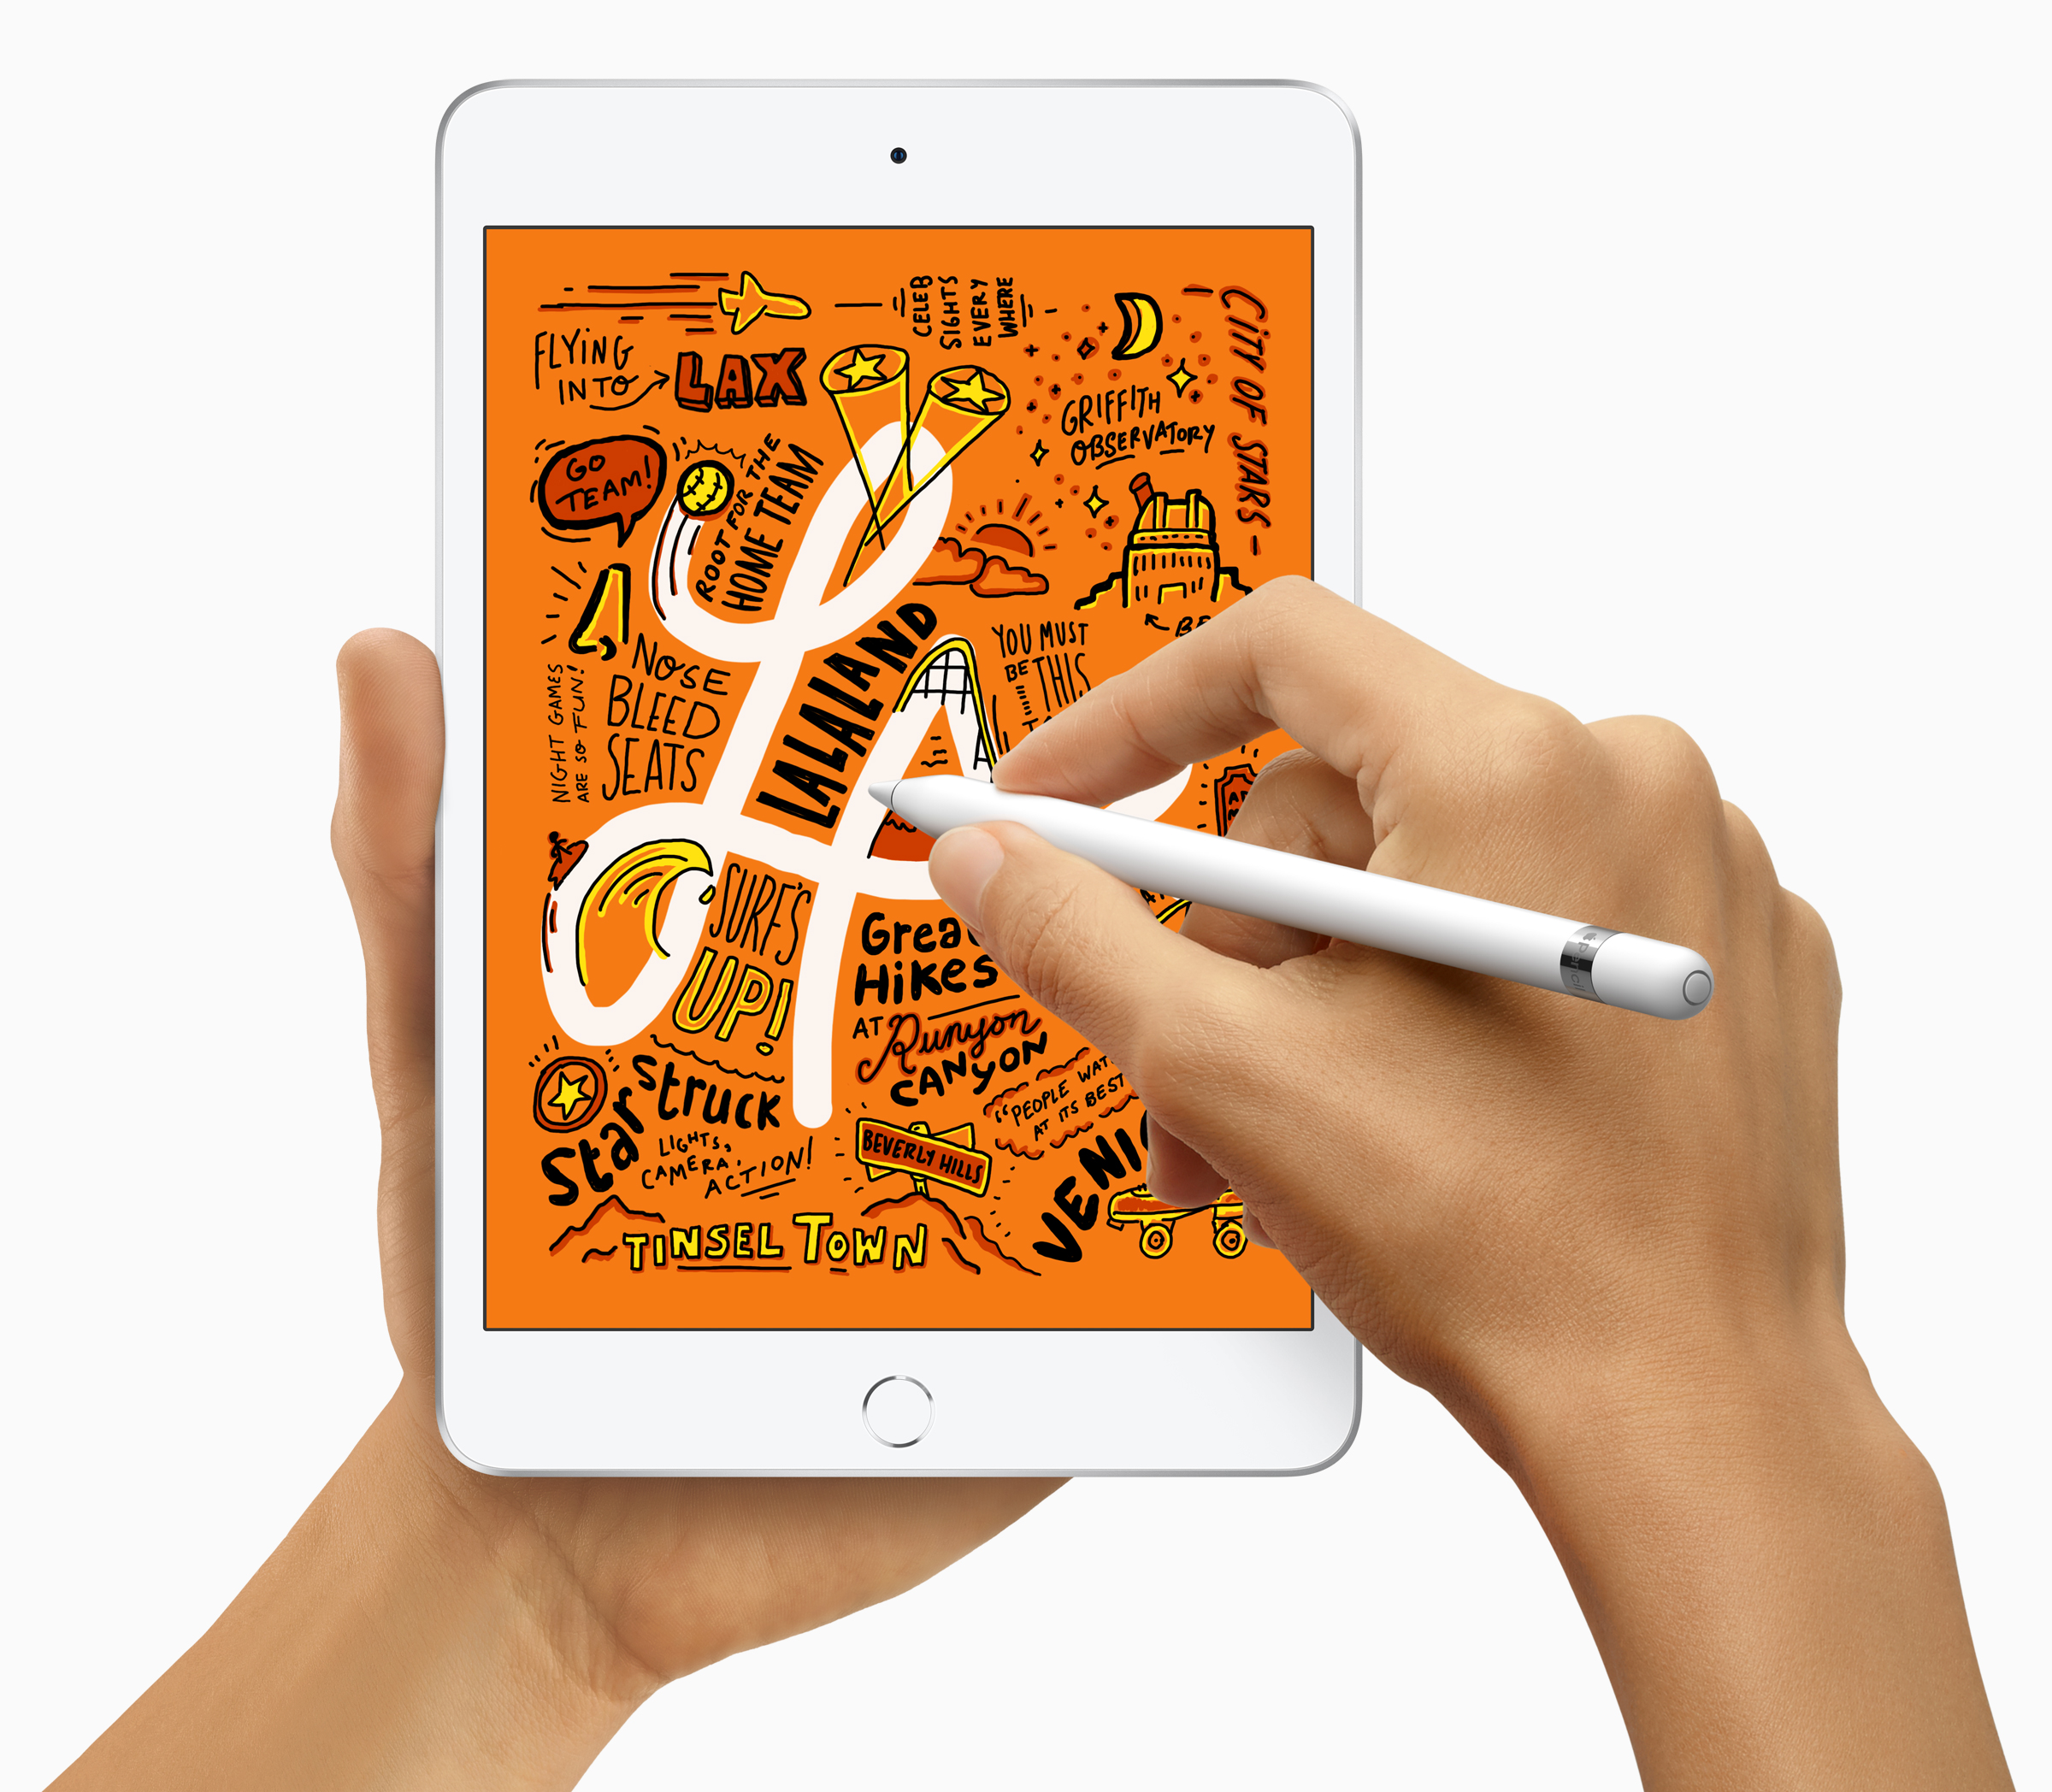
iPad mini lovers, rejoice! If you’ve been holding onto an aging iPad mini because of its small size, you’ll be happy to learn that Apple has at long last released a new 7.9-inch iPad mini with modern-day technologies. Joining it in the lineup is a new 10.5-inch iPad Air that turns out to be a retooled iPad Pro for a lot less money.
iPad mini Gains A12 Bionic Chip and Apple Pencil Support
It has been hard to recommend the iPad mini 4—last updated in September 2015—for several years now because its hardware was increasingly long in the tooth, and Apple hadn’t seemed enthused about updating it.
That has all changed with the fifth-generation iPad mini, which boasts the same speedy A12 Bionic chip that powers today’s iPhone XR, XS, and XS Max. It provides over three times the performance as the iPad mini 4’s A8 chip and graphics that are nine times faster. The other huge change is that the iPad mini now lets you use the $99 Apple Pencilfor drawing, taking notes, and more. Note that the iPad mini supports only with the first-generation Apple Pencil, not the second-generation model that’s specific to last year’s iPad Pro models.
Other welcome, but less notable, changes include a screen that is 25% brighter, displays more colors, and supports Apple’s True Tone technology for matching the color temperature of the screen to the light in your surroundings. The Wi-Fi + Cellular model of the iPad mini also now supports faster gigabit-class LTE connections and the improved Bluetooth 5.0.
The basic specs of the rear-facing camera on the new iPad mini haven’t changed—it’s still an 8-megapixel camera—but it likely takes better photos and videos thanks to the A12 Bionic chip’s computational photography capabilities. Plus, the front-facing FaceTime HD camera can now capture 1080p video at 30 frames per second for better FaceTime calls.
You can order the iPad mini now in silver, space gray, and gold. For 64 GB of storage, a Wi-Fi–only model costs $399, whereas a 256 GB model is $549. Adding cellular connectivity bumps the prices to $529 and $679.
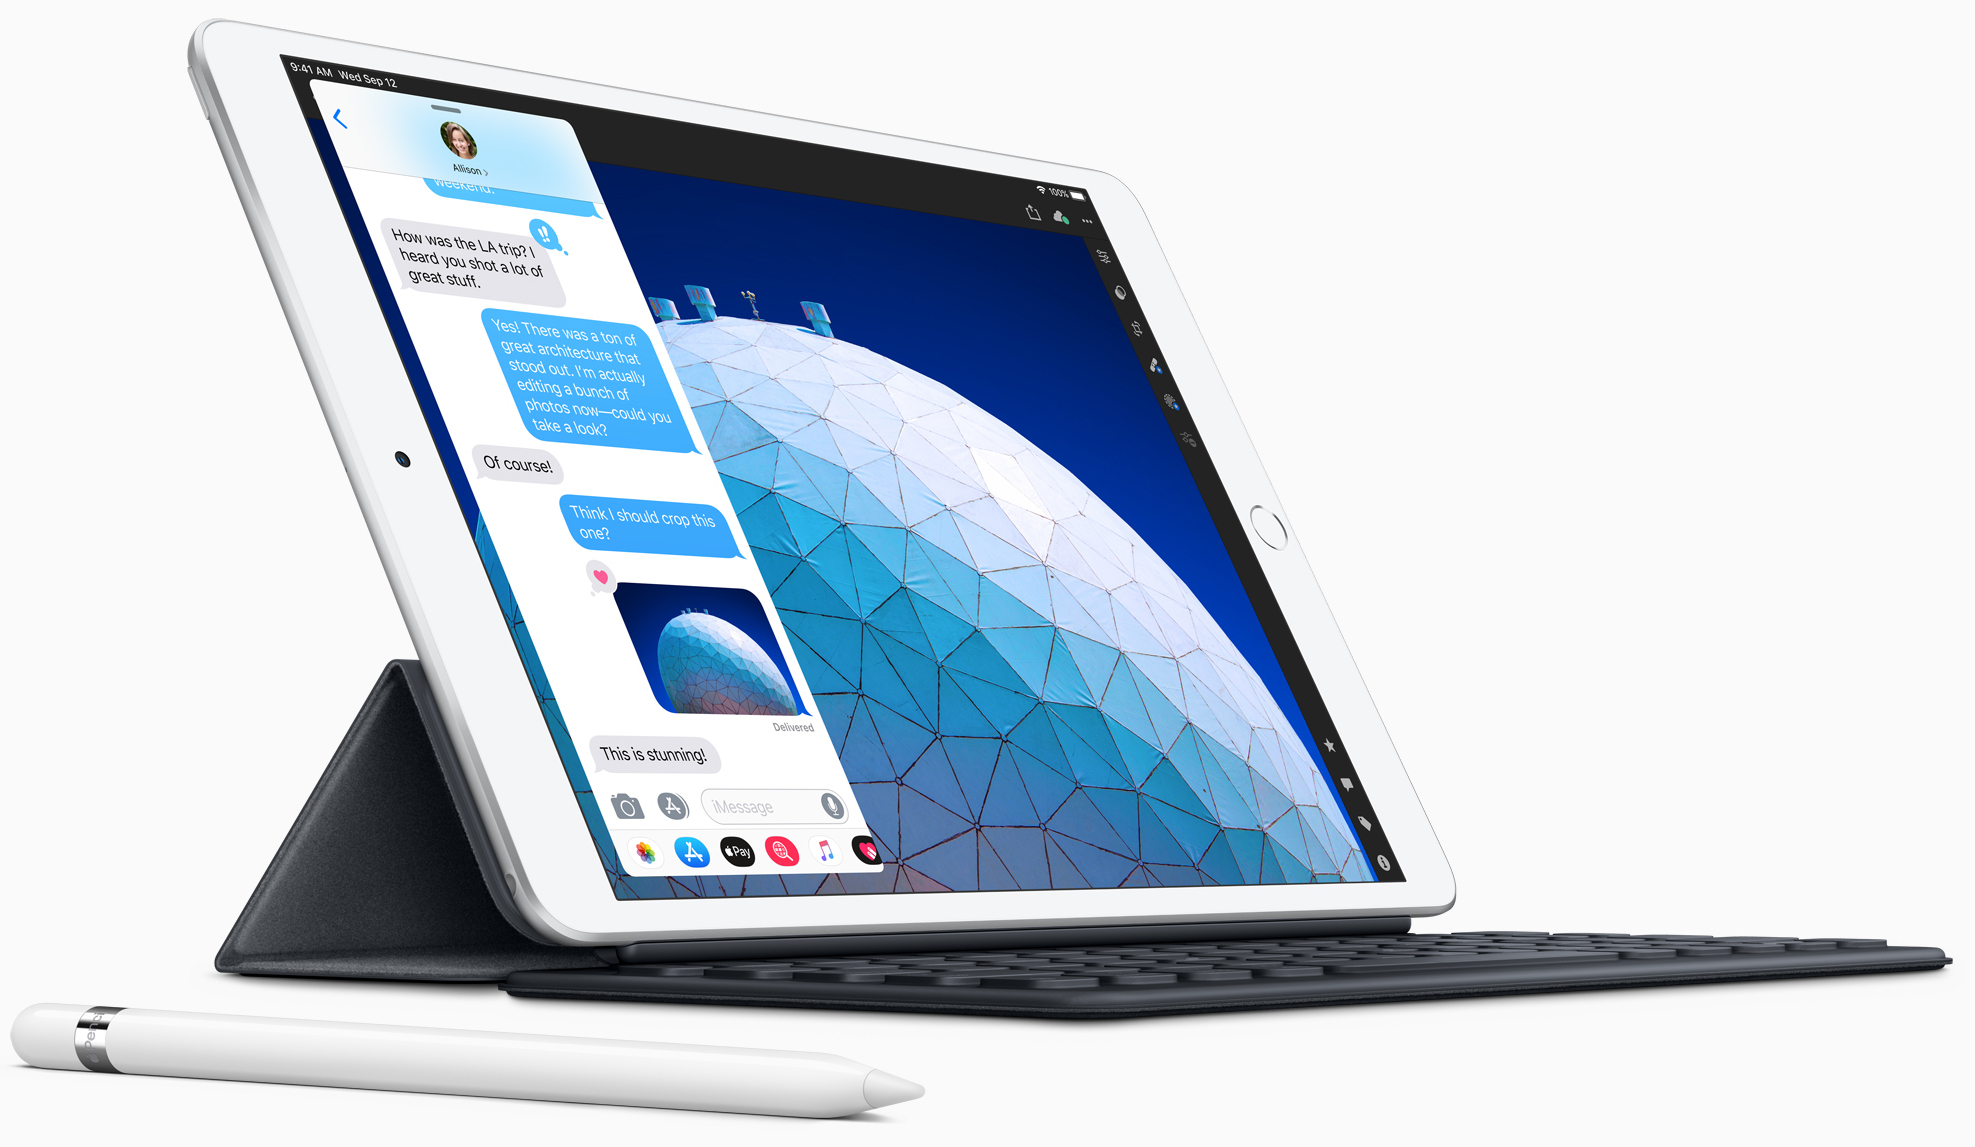
iPad Air Lowers the 10.5-inch iPad Pro Price with a Less-Capable Camera
Despite its name, the new 10.5-inch iPad Airhas far more in common with the now-discontinued 10.5-inch iPad Pro from 2017 than it does with the 9.7-inch iPad Air 2 from 2014.
Apple has clearly taken the iPad Pro and modernized it with the current A12 Bionic chip, gigabit-class LTE, eSIM, and Bluetooth 5.0. But to cut $150 from the iPad Pro’s $649 starting price, Apple replaced the iPad Pro’s rear-facing camera with a less-capable model and traded the quad speaker system for stereo speakers. That’s not to say that the iPad Air’s rear-facing camera is a problem—it’s the same 8-megapixel camera as in the iPad mini—it’s just not at the level of the 12-megapixel camera that was in the 10.5-inch iPad Pro.
Like the old iPad Pro, the iPad Air supports the first-generation Apple Penciland the original $159 Smart Keyboard(again, not the Smart Keyboard Folio for the 2018 iPad Pro models).
As with the iPad mini, Apple offers only two tiers of storage, 64 GB for $499 and 256 GB for $649, and the cellular option increases the pricing to $629 and $779. The color choices are again silver, space gray, and gold.
Other iPads
Apple’s slate of iPads makes a lot of sense now, with this new fifth-generation iPad mini and third-generation iPad Air joining the sixth-generation iPad and the 11-inch iPad Pro and third-generation 12.9-inch iPad Pro.
If you want small, get an iPad mini. If you want cheap, buy the iPad. If you’re looking for a bigger screen or Apple keyboard (the Smart Keyboard is excellent), go for the iPad Air. And if you have the budget, the 11-inch and 12.9-inch iPad Pro models are fabulous. Apple has a helpful online comparison tool, or feel free to ask us what we’d recommend for you.
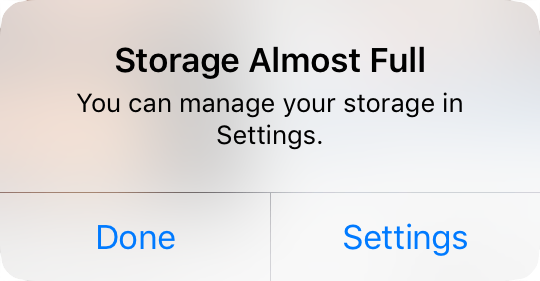
Little is more frustrating than running out of space your iPhone or iPad. You can’t take new photos, you can’t download new apps, some things may not work at all, and iOS will nag you repeatedly about how you can “manage” your storage in Settings. Luckily, over the past few versions of iOS, Apple has significantly improved the options for clearing unnecessary data from your device.
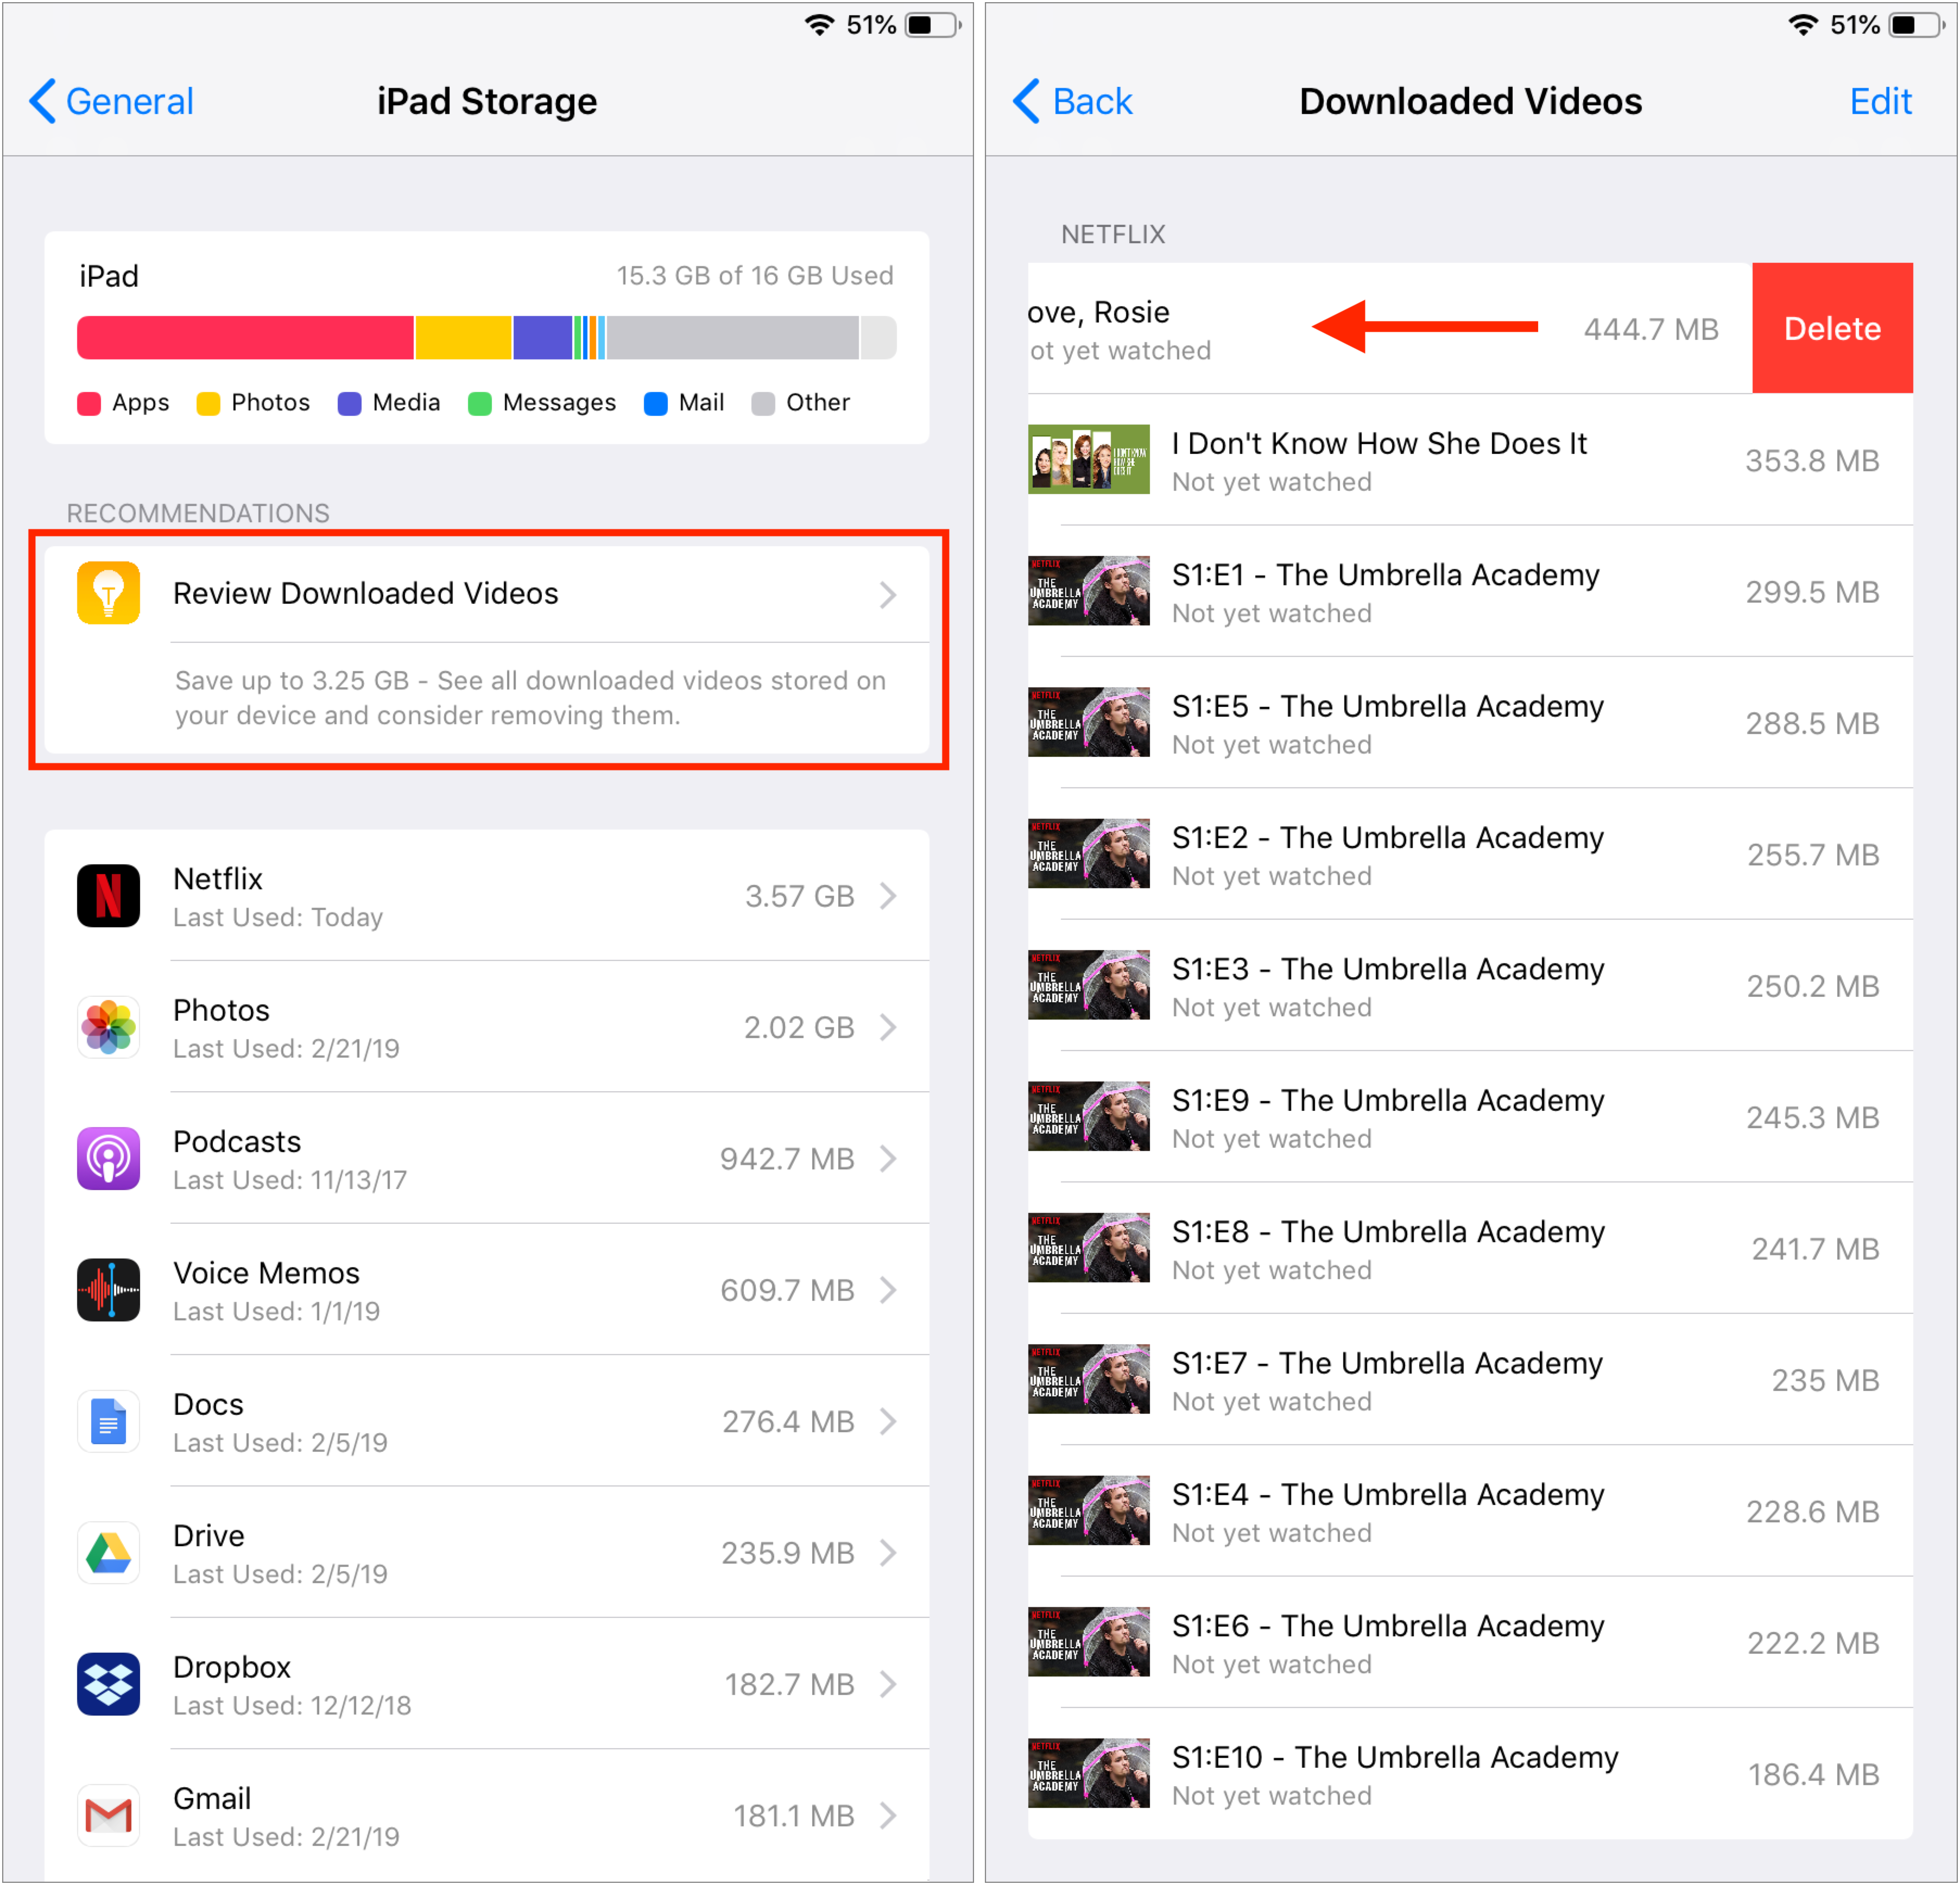
Storage Graph
To get started clearing space, go to Settings > iPhone/iPad Storage. At the top of the screen, a graph reveals where your space is going, such as Apps, Photos, Media, Messages, Mail, Books, iCloud Drive, and Other. You can’t do anything with the graph, but it will likely reveal the main culprits.
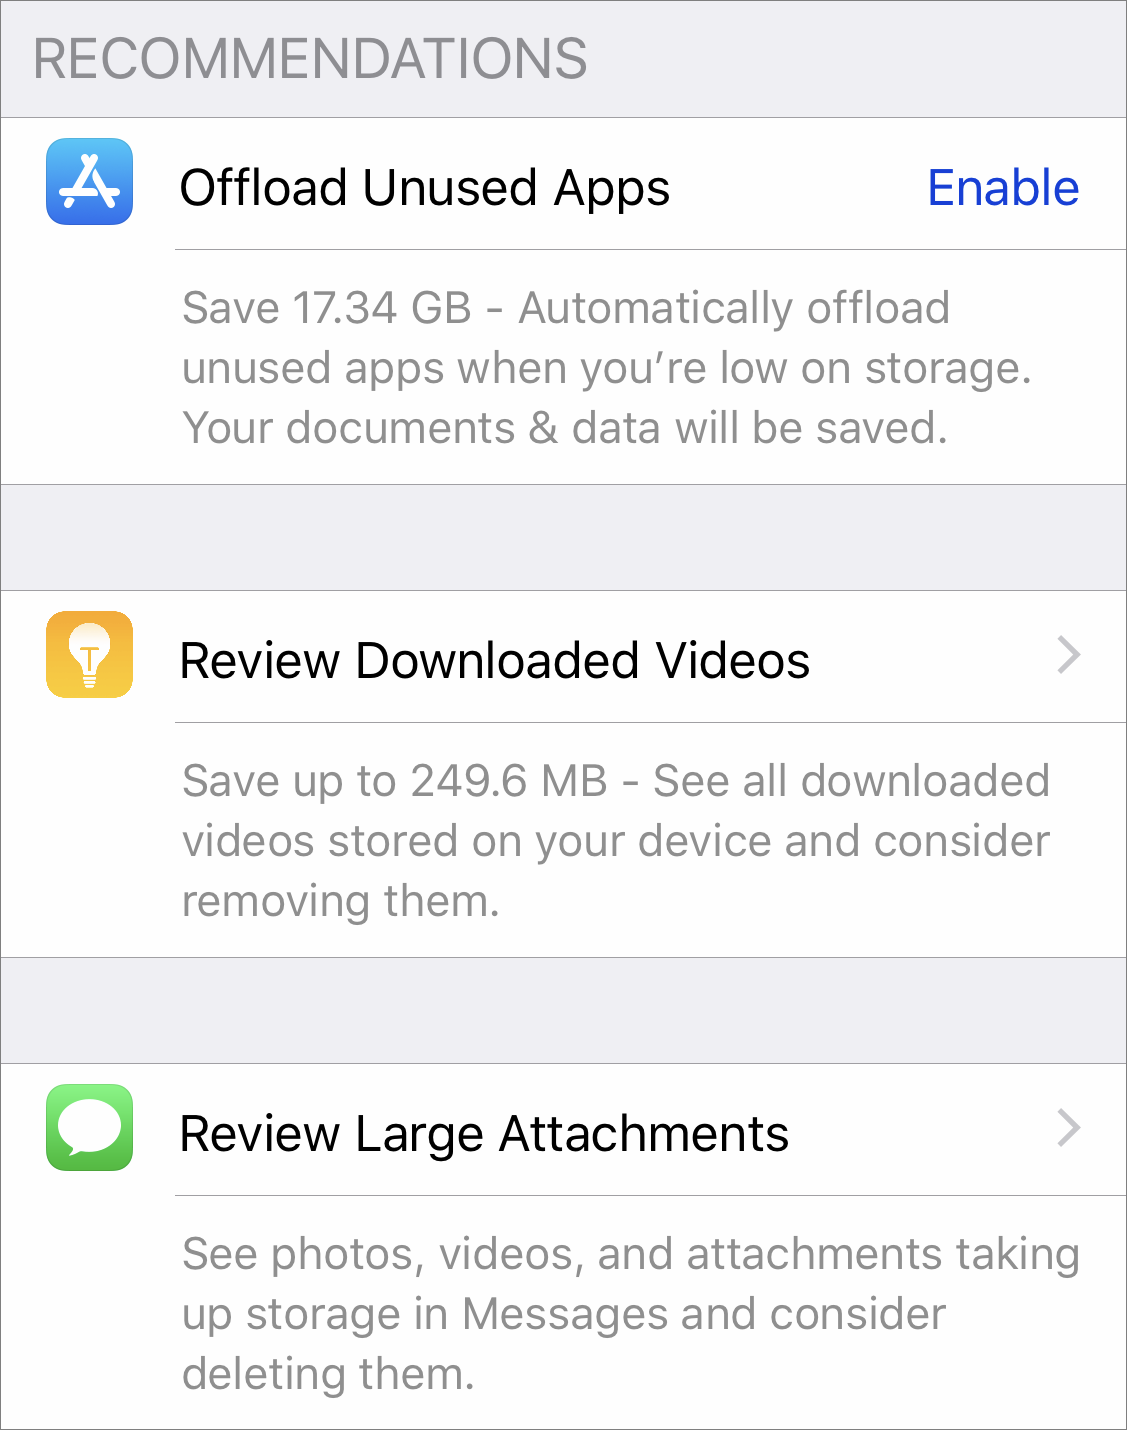
Recommendations
Next, iOS shows recommendations for quick ways to recover space. These vary based on how you use your device, so you will likely see other options here.
Some of the possibilities include:
Offload Unused Apps:This choice is particularly helpful if you download a lot of apps that you later stop using. Enable it, and iOS automatically recovers space from unused apps when you’re low on storage. Each of these apps remains on your Home screen with a little cloud icon next to it, and when you next tap the app to open it, iOS re-downloads the app from the App Store. You won’t lose any documents, data, or settings associated with an offloaded app.
Review Downloaded Videos:Some apps, like Netflix, can download videos for offline watching. That’s great for when you’re on a long flight, but if you forget to delete the videos, they can consume a lot of space. This option shows them to you and lets you swipe left on any one to
Review Large Attachments:Photos, videos, and other files sent to you in Messages can take up a lot of space. This recommendation reveals them and lets you swipe left to delete those you don’t need to keep.
“Recently Deleted” Album:When you delete photos in the Photos app, they go into the Recently Deleted album, where they’ll be deleted automatically after up to 40 days. This recommendation lets you remove those images right away.
Review Personal Videos:Shooting videos with your iPhone or iPad can guzzle storage, so this recommendation shows you the videos you’ve taken in case you don’t want to keep them.
iOS’s recommendations are quite good and may be all you need to clear space quickly. However, if you need to dig deeper, you can look at the usage of individual apps.
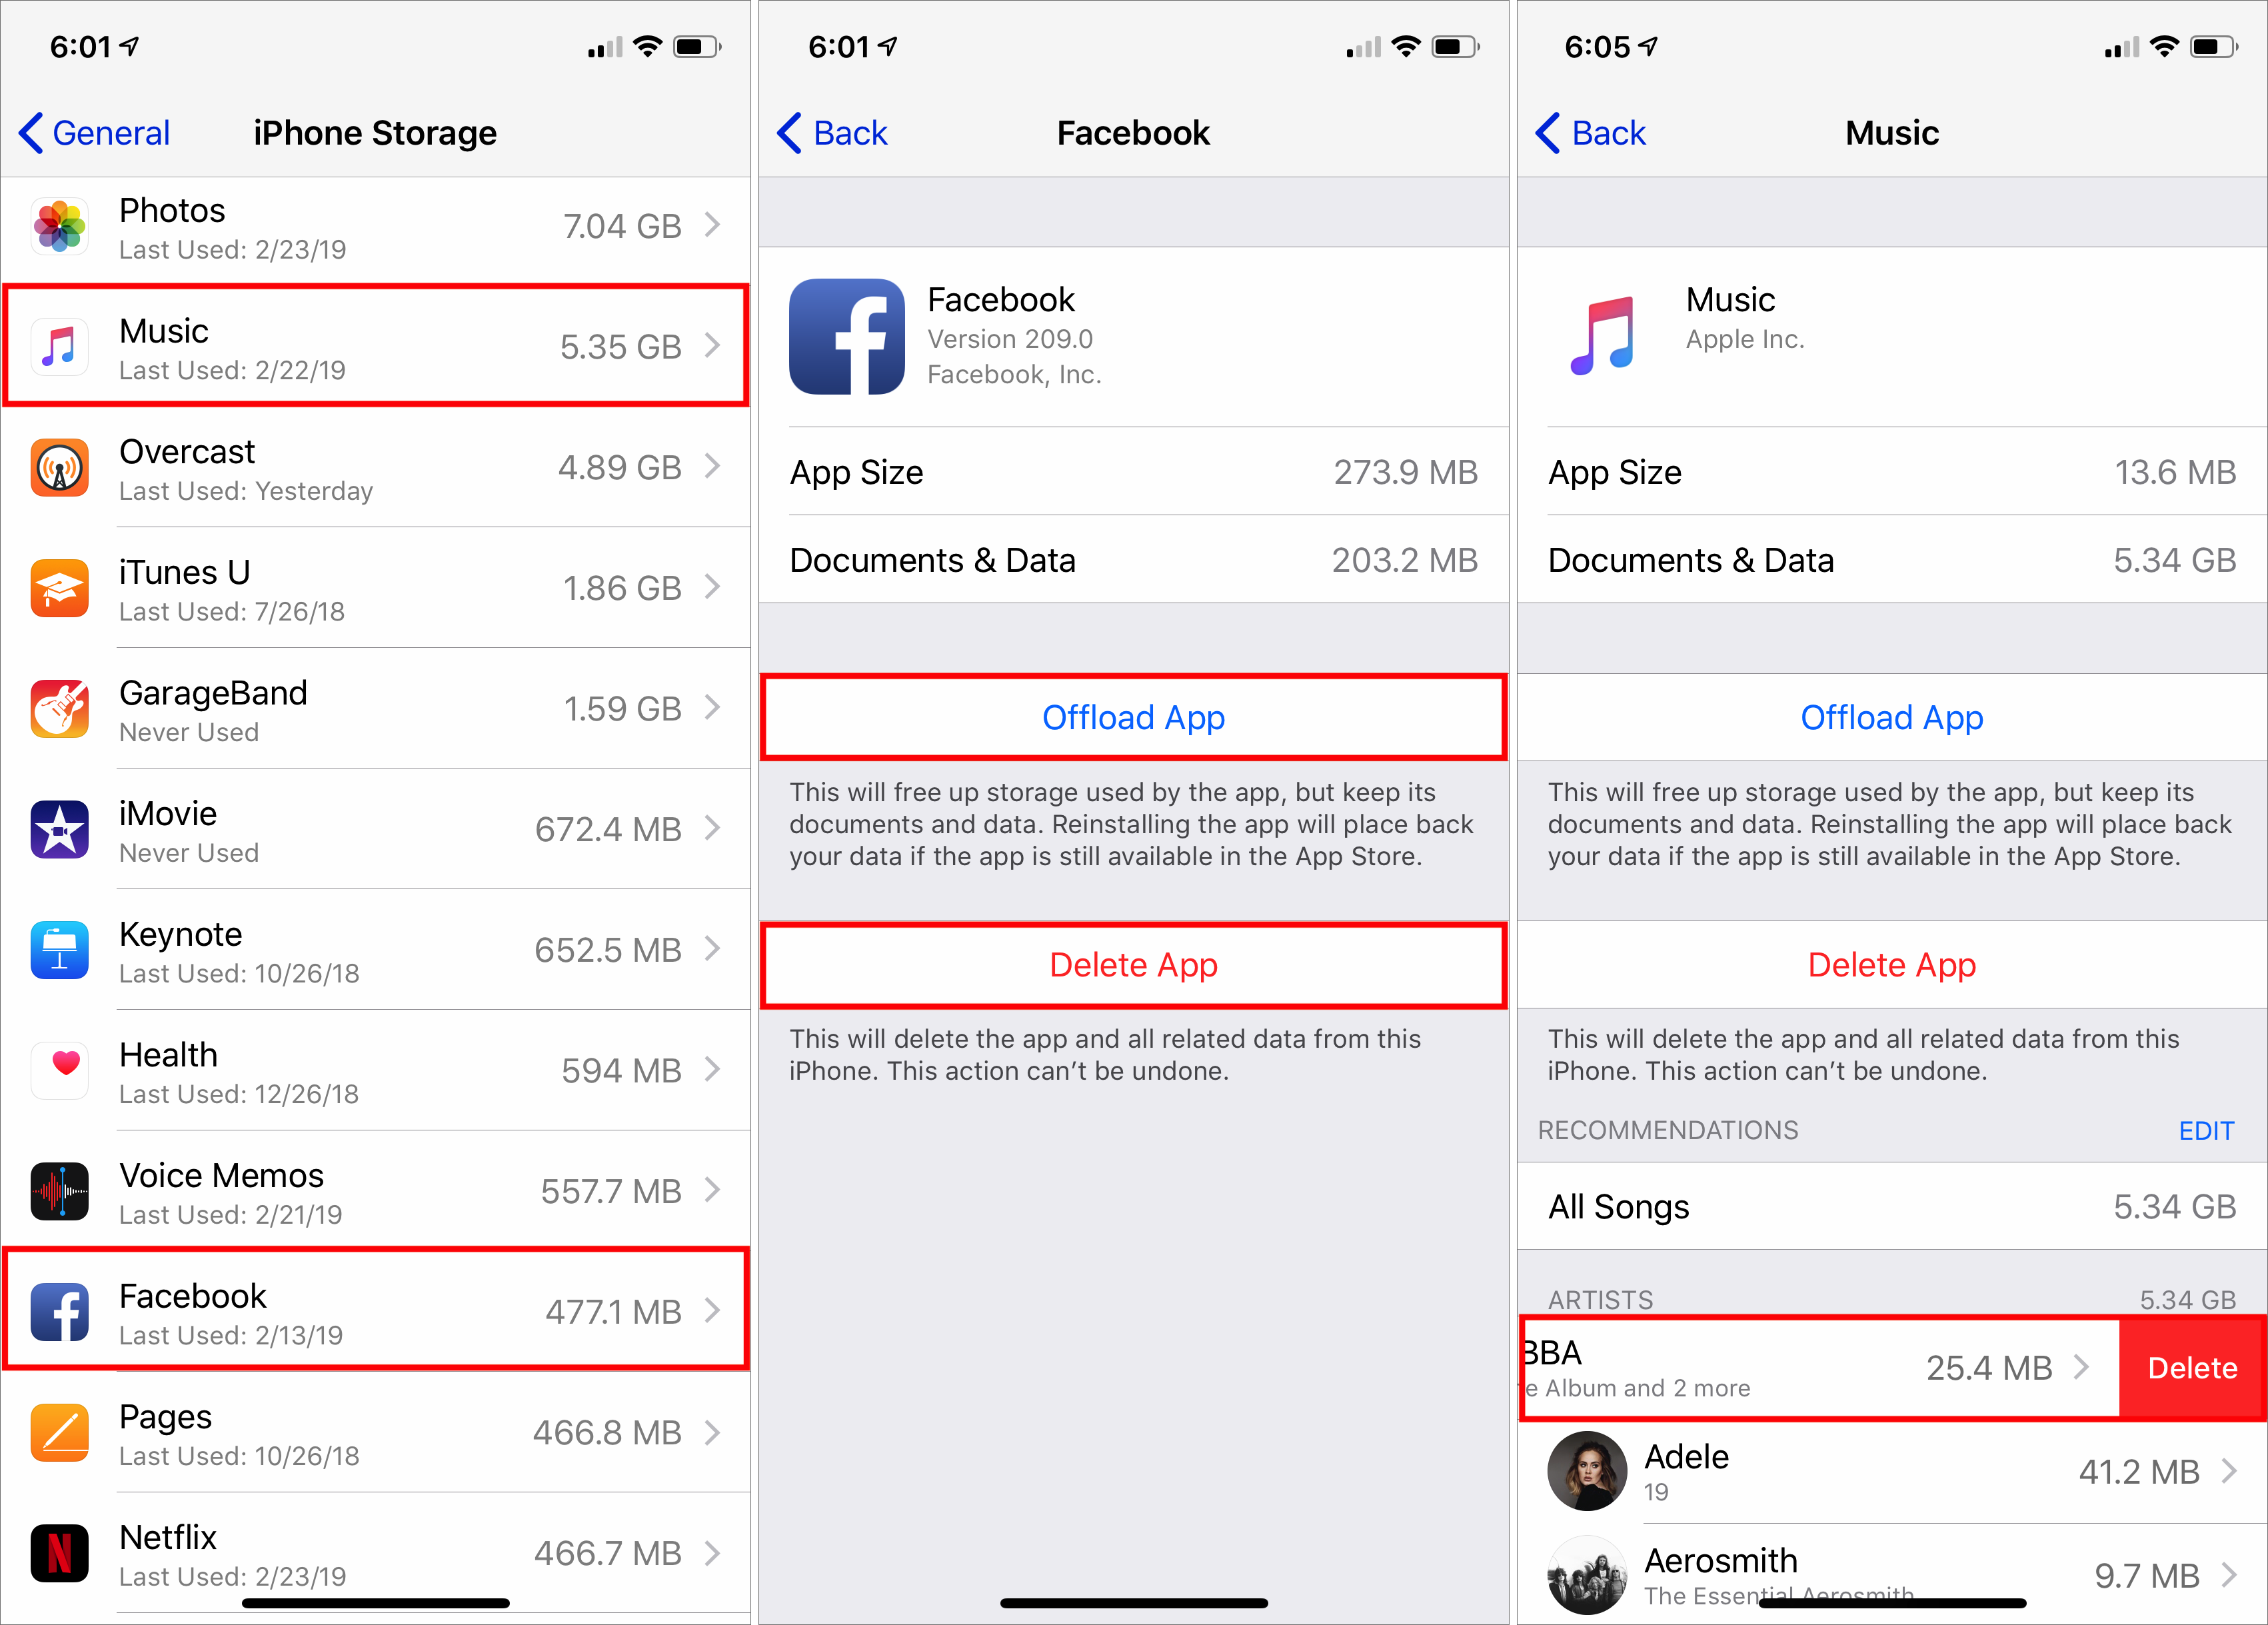
Individual App Usage
The third and final section of the iPhone/iPad Storage screen lists every app on your device, sorted by how much space it takes up. Along with the app’s name and how much space it consumes, iOS helpfully tells you the last time you used the app. You may even see “Never Used” for older apps that you’ve carried over from previous devices but haven’t opened on this one.
When you tap an app, iOS shows more information about how much space the app and its documents occupy, and lets you tap Offload App or Delete App to recover its space. For some apps, mostly those from Apple, like Music and Podcasts, iOS also shows the data stored by the app and lets you delete any individual item (swipe left).
Focus on the apps at the top of the list—the list is sorted by size—since it will be a lot easier to realize, for instance, that you’ve never used GarageBand and recover its 1.59 GB of space than to sort through a long list of apps and their data.
With all these the tools from Apple, you should have no trouble making space on your device for more photos, videos, and apps that you actually want to use.


 users, whereas a $69.99 Office 365 Personal subscription is for just one user. On the business side, you can pay $5, $8.25, or $12.50 per user per month for different Office 365 plans. The low-end plan doesn’t include the desktop versions of the Office apps, and the high-end plan provides Exchange, SharePoint, and Teams in addition to all the Office apps and 1 TB of OneDrive storage for each user.