Did You Know Apple Hid Huge Reference Books in Your Mac?

by | July 27, 2017

You’re probably used to Mac apps using red underlines to mark misspelled words, but did you know that macOS has long included a fully featured Dictionary app as well? It provides quick access to definitions and synonyms in the New Oxford American Dictionary and the Oxford American Writer’s Thesaurus, along with definitions of Apple-specific words like AppleCare and MacTCP. But that’s far from all it can do.

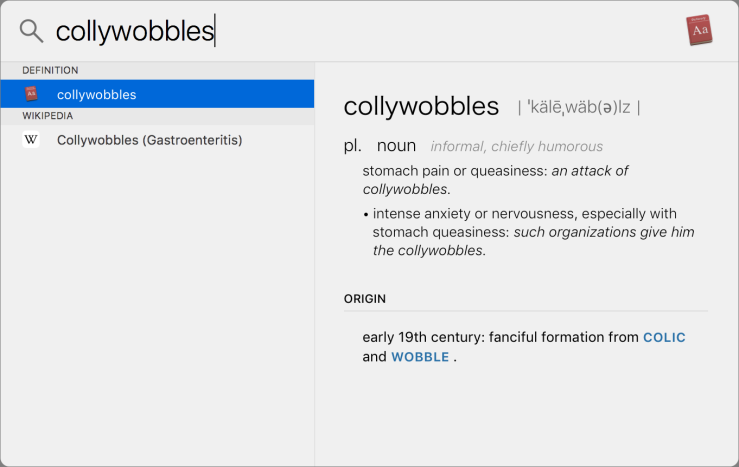
First, let’s make sure we’re all on the same page. Launch the Dictionary app from your Applications folder and then type a word or phrase into the Search field. As you type, Dictionary starts looking up words that match what you’ve typed so far—you don’t even have to press Return. If more than one word matches what you’ve typed, click the desired word in the sidebar.

Dictionary-Mac-lookup

Notice the lozenges below the toolbar, representing the references that Dictionary can consult, and no, your eyes aren’t deceiving you—Dictionary can look things up in Wikipedia if your Mac has an Internet connection. In short, Dictionary gives you instant access to a dictionary, a thesaurus, and an encyclopedia containing over 5.4 million articles in English alone! You can click a reference’s lozenge to limit your search, or select All to scan all of them.

Dictionary-Wikipedia

If you want to look up words in another language, or even just British English, Dictionary has you covered, with a long list of other reference works. Choose Dictionary > Preferences and select those you’d like to use. You can drag the selected entries into the order you want their lozenges to appear below the toolbar.

Dictionary-prefs

Once you’re in a definition, note that you can copy text for use in other apps—always helpful when wading into grammar and usage arguments on the Internet. More generally, you can click any word in Dictionary’s main pane to look it up instantly. If dictionaries had been this much fun in school, we’d have larger vocabularies! Use the Back and Forward arrow buttons to navigate among your recently looked-up words.


As helpful as the Dictionary app is, you probably don’t want to leave it running all the time. Happily, Apple has provided quite a few shortcut methods for looking up words

  • Press Command-Space to invoke Spotlight, and enter your search term.

Dictionary-Spotlight

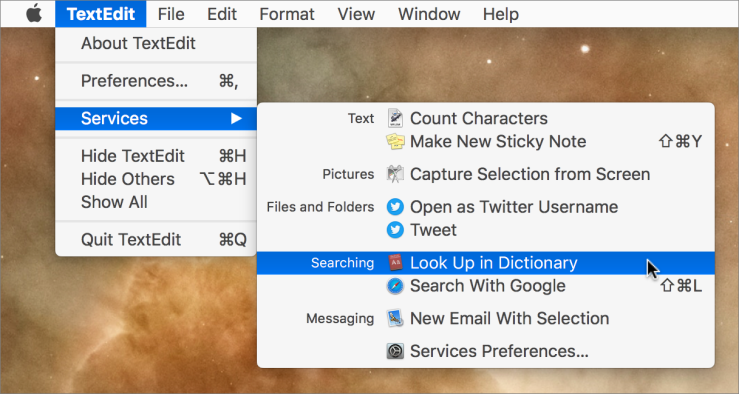
  • Select a word, and then choose AppName > Services > Look Up in Dictionary to launch Dictionary and search for that word. This trick should work in most apps, but won’t work in all. If the Look Up in Dictionary command doesn’t appear, make sure it’s enabled in System Preferences > Keyboard > Shortcuts > Services, in the Searching category.

Dictionary-Lookup-Service

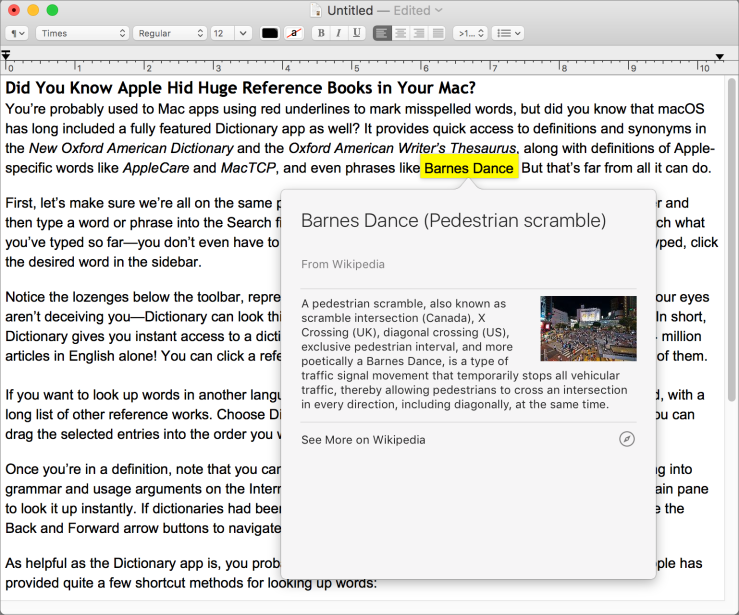
  • Last but best, hover over a word or phrase with the mouse pointer and either press Command-Control-D or Control-click the word and choose Look Up “word.” If the app supports it, macOS displays a popover with the definition or Wikipedia article. If you have a trackpad, you can also do a force-click or three-finger tap on the selected word—make sure the “Look up & data detectors” checkbox is selected in System Preferences > Trackpad > Point & Click.

Dictionary-inline-lookup

Now that you know how to take full advantage of the reference works that Apple has built into macOS, it’s time to get in touch with your inner logophile (feel free to look that one up).

Try This Quick Shortcut for Turning Off iPhone Alarms

by | July 13, 2017

If you’re like us, your iPhone has replaced that old digital alarm clock by your bedside. But one way that the iPhone doesn’t match up is the ease of thwacking a big Off button to stop the annoying wake-up noise. Happily, you don’t have to open your eyes and find the Stop button to silence the alarm—instead, just reach out and press the Home button.

iPhone-alarm

Finder Secrets: Navigating Your Folder Hierarchy with the Path Bar

by | July 3, 2017

Apple is known for creating clever little features that do a lot more than most people realize. Learn these, and you’ll be the master of your Mac. And more important, you’ll get your work done more quickly!

Have you ever noticed the Path Bar at the bottom of Finder windows? It may or may not be showing—if not, choose View > Show Path Bar to reveal it. The Path Bar has two basic goals in life:


  1. It wants to show where you are in your drive’s folder hierarchy. As you navigate into nested folders, it’s easy to get lost and not realize where you are. If you accidentally drag a file into a deeply nested folder, you might have trouble finding that folder later.
  2. It wants to help you navigate to and work with all the folders higher up in the folder hierarchy, so you don’t have to open a new window and laboriously navigate to the folder you want.


To make sure we’re all on the same page, here’s a quick look at how the Finder is organized. The top level of your folder hierarchy is your drive—call it Macintosh HD for the moment. Inside Macintosh HD are macOS’s standard folders: Applications, Library, System, and Users. Your home folder is inside Users, and inside your home folder are more built-in folders: Desktop, Documents, Downloads, Movies, Music, Pictures, and Public. All the files and folders you create go inside those folders in your home folder. The screenshot below shows this in Column view.

Path-Bar-folder-hierarchy

But what if you aren’t working in Column view, or your window isn’t wide enough to show the full hierarchy? Look at the bottom of the window, where you see the Path Bar. It shows the same folder hierarchy: Macintosh HD/Users/Guest (paths are always written with slashes between the folders). Now check out this next window, which shows a folder of flower photos inside the Pictures folder.

Path-Bar-flowers

Now that we’re in Icon view, it’s impossible to tell where in the folder hierarchy we are, or rather, it would be if the Path Bar wasn’t showing our exact location. It even identifies the selected file.

Here’s the thing even people who know about the Path Bar seldom realize: every item in it is live. Say you have another folder of photos sitting on your Desktop that you want to move into the Pictures folder. To make the move, simply drag that folder onto the Pictures folder in the Path Bar. Next, assume you want to open that other folder. Just double-click it in the Path Bar to open it. You can open any folder in the Path Bar this way.

There are three other things you can do with any folder in the Path Bar: open it in a new Finder window tab, show it in its enclosing folder, and get info about it. To carry out any of these actions, Control-click or right-click a folder in the Path Bar to get a contextual menu with those commands. (Similar commands appear if you Control-click a selected file at the end of the Path Bar, but it’s better to Control-click a file directly because the Mac offers more choices that way.)

Path-Bar-contextual-menu


Knowing how to use the Path Bar may not be necessary for managing files and folders on your Mac, but turn it on and keep it in mind—you’ll appreciate its convenient time-savers.